Tired of cluttered countertops and tangled cords? Installing a wall-mount hair dryer is a smart, space-saving upgrade for any bathroom, salon, or hotel room. Whether you choose a built-in retractable model or a simple DIY hook for your handheld dryer, the right installation improves safety, accessibility, and style. This guide covers every step from planning placement and choosing hardware to final safety checks.
You will learn how to securely mount your unit on any wall type, avoid common mistakes, and ensure long-term performance. We cover both professional retractable units and budget-friendly DIY solutions so you can pick the approach that fits your space and needs.
Choose Your Wall-Mount Hair Dryer Type
Before picking up tools, decide which type of wall-mount system fits your needs and wall construction.
Built-In Retractable Units
These permanent installations feature a spring-loaded arm that extends outward and retracts flush to the wall. Brands like Collins TempTura, CCI Beauty, and Conair Professional dominate this category.
- Best for permanent setups, hands-free drying, and commercial use
- Power options include plug-in or hardwired models
- Weight range is 6 to 10 pounds, requiring sturdy mounting into studs or masonry
- Requires GFCI outlet nearby and proper wall support
DIY Handheld Dryer Mounts
Ideal for renters or budget-conscious homeowners, these systems use screw-in hooks, brackets, or adhesive mounts to hang a standard hair dryer.
- No electrical changes needed since the dryer stays plug-in
- Best for decluttering small bathrooms and temporary setups
- Avoid adhesive hooks in humid areas as they often fail over time
- Recommended solution is a metal swag hook with toggle bolt for lasting hold
Gather Required Tools and Hardware
Having the right tools before starting prevents mid-project trips to the hardware store.
For Retractable Models
- Drill with masonry bit for tile, brick, or concrete walls
- Stud finder to locate solid backing
- Level to ensure straight alignment
- Flathead screwdriver to release safety latches
- Safety pin and retaining clip included with the unit
- Wood screws, concrete screws, or toggle bolts based on wall type
For DIY Hook Installations
- Metal swag hook as the primary hanging point
- Toggle bolt for secure hold in drywall
- Drill bits ranging from 1/8 inch to 1/2 inch
- Measuring tape and pencil for marking placement
- Elastic hair tie or carabiner to create a loop on the dryer handle
Plan the Perfect Mounting Location
Proper placement ensures usability, safety, and smooth operation.
Find the Right Height and Spot
Mounting height directly affects comfort and functionality.
- 48 inches is best for seated use in salons and spa chairs
- 60 inches is ideal for standing use in home bathrooms
- Measure from floor to center of the mounting bracket
Assess Wall Type and Support
Your wall type determines the mounting method and hardware needed.
- Wood stud: Use wood screws for the most secure hold
- Concrete or tile: Use masonry bit with concrete screws
- Hollow drywall without stud: Use toggle bolts or heavy-duty anchors
- Brick: Use masonry fasteners rated for the load weight
Drywall alone cannot support retractable units. Always anchor into a stud or use toggle bolts rated for the weight.
Install a Built-In Retractable Hair Dryer Unit
Follow these sequential steps for permanent retractable models.
Mount the Wall Bracket
- Remove protective plastic from the bracket.
- Hold at desired height between 48 and 60 inches and use a level to mark screw holes.
- Drill pilot holes appropriate for your wall type.
- Secure bracket with appropriate fasteners and test stability by pushing firmly to check for movement.
Attach Arms and Hood Assembly
The arm contains a powerful internal spring. Do not unfurl the cord yet.
- Remove the safety pin from the hood.
- Use a flathead screwdriver to press the latch on the plastic sheath at the arm end.
- Slide sheath toward arm to expose the connection point.
- Align hood with arms and attach securely.
- Reinsert the safety pin through the designated hole.
- Slide sheath back to cover and lock the pin.
- Gently tug the hood to confirm it does not detach.
Install Retaining Clip and Safety Mechanism
- Remove the safety clip from the hanging mechanism.
- Insert the retaining clip into the arm so it engages the groove on the shaft.
- Push upward until flush on both sides.
- Tighten the retaining screw fully.
- Reattach the safety clip over the assembly.
Improper clip installation may cause the unit to fall during use.
Hang the Dryer Unit
- Lift the unit, getting help if it is heavy.
- Hook the arm assembly onto the bracket shaft.
- Confirm it seats fully and moves smoothly.
- Carefully unfurl the extension cord from around the arms without yanking.
Remove the Shipping Cleat
Locate the plastic or metal shipping cleat near the top of the arm and unscrew it completely. Test that the unit extends and retracts freely.
Leaving the shipping cleat in place can damage the spring mechanism.
Install a DIY Wall Hook for Handheld Dryers
This simpler method works well for renters and budget installations.
Mark and Drill the Mounting Point
- Choose a location near a GFCI outlet, clear of door swing.
- Use a level or measure from the floor to ensure straight alignment.
- Mark the drill point with a pencil.
- Drill a 1/8 inch pilot hole at the marked location.
Insert Toggle Bolt If No Stud Is Available
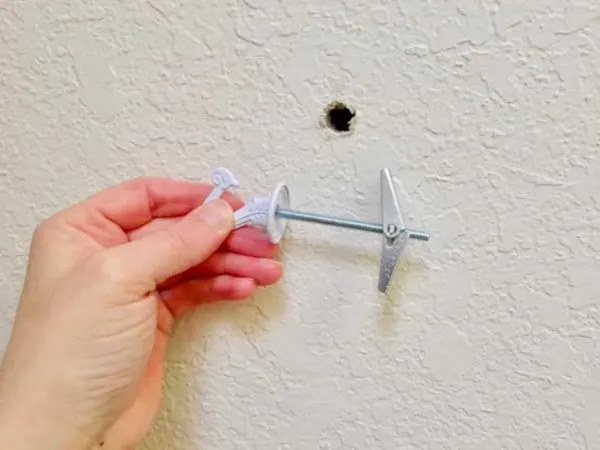
- Thread the toggle bolt through the swag hook.
- Fold the wings together and insert into the hole.
- Wings spring open behind the drywall.
- Pull back gently until wings press against the back of the wall.
Secure the Hook
- Push the bolt through until the toggle engages.
- While applying slight outward tension, tighten clockwise.
- Stop when the hook is firm and does not wobble.
Tug hard on the hook to test stability before hanging your dryer.
Create a Hanging Loop on the Dryer
Most handheld dryers lack built-in loops. Create one using these methods.
- Wrap an elastic hair tie around the base of the handle
- Loop a second hair tie through the first to form a secure knot
- Alternative options include a carabiner clip, silicone strap, or third-party loop sleeve
Two rubber bands wrapped around the handle can create a durable hanging loop that lasts over a decade.
Final Safety and Function Check
Verify everything is properly installed before regular use.
Verify Stability
- Bracket or hook shows no wobble or movement when pushed
- Hood stays attached when pulled
- Safety pin and retaining clip are in place and covered
Test Range of Motion
- Dryer extends and retracts smoothly without sticking
- No interference with doors, mirrors, or furniture
- Fully retracted, the unit lies flat against the wall
Inspect Electrical Setup
- Cord is free of kinks, pinching, or abrasions
- Plug reaches the outlet without strain
- Unit is plugged into a GFCI-protected outlet
- Consider auto-shutoff models for enhanced fire safety
Maintain Your Wall-Mount Hair Dryer
Regular maintenance extends the life of your installation.
Monthly Maintenance Tasks
- Check for loose screws or wall damage
- Inspect the extension cord for fraying or wear
- Wipe arms and hood with a damp cloth, avoiding harsh chemicals
- Test spring tension to ensure smooth retraction
Long-Term Care Tips
- Replace toggle bolts if drywall begins to crack
- Store original hardware in a labeled bag for future repairs
- Register the product online to activate the warranty, typically 1 to 5 years
Frequently Asked Questions About Wall-Mount Hair Dryer Installation
Can I install a wall-mount hair dryer myself or do I need a professional?
You can install both DIY hook mounts and built-in retractable units yourself. Built-in models require more precision with spring mechanisms and electrical considerations. If you are uncomfortable with electrical work or precise mechanical assembly, consider hiring a professional.
What wall type can support a wall-mount hair dryer?
Wood studs provide the strongest anchor for built-in units. Concrete, tile, and brick walls require masonry bits and concrete screws. Hollow drywall without a stud requires toggle bolts rated for the weight. Drywall alone cannot support retractable units.
How high should I mount a wall-mount hair dryer?
The standard range is 48 to 60 inches from the floor. Mount at 48 inches for seated use in salons and at 60 inches for standing use in home bathrooms. Choose based on your primary use scenario.
Do wall-mount hair dryers need special electrical outlets?
Yes, bathrooms require GFCI-protected outlets by NEC code. The installation location must be near an existing GFCI outlet within the cord reach. Avoid installing inside showers or where water can spray directly on the unit.
Can I use adhesive hooks for a wall-mount hair dryer in the bathroom?
Adhesive hooks are not recommended for bathroom use. Humidity causes adhesive failure over time. Metal swag hooks with toggle bolts provide much more reliable, long-term holding power in steamy bathroom environments.
How do I create a hanging loop on a handheld hair dryer?
Wrap an elastic hair tie around the base of the handle, then loop a second hair tie through the first to create a secure knot. Alternative solutions include carabiner clips, silicone straps, or third-party loop sleeves designed for hair dryers.
Key Takeaways for Installing Your Wall-Mount Hair Dryer
Installing a wall-mount hair dryer transforms your bathroom into a cleaner, safer, and more functional space. Choose between a permanent built-in retractable unit for professional-grade performance or a DIY hook system for a budget-friendly, renter-friendly solution.
Always mount into proper wall support whether studs, masonry, or rated toggle bolts. Never skip critical steps like removing the shipping cleat on retractable units or verifying GFCI protection for electrical safety. Use metal hardware instead of adhesive hooks in humid bathrooms for lasting reliability.
For renters, a metal swag hook with toggle bolt offers a secure, non-damaging solution. For homeowners wanting professional performance, a built-in retractable model delivers hands-free convenience that lasts for years. Plan carefully, follow the sequential steps, and enjoy your clutter-free countertop and seamless styling routine.