
If you have ever struggled with frizzy, undefined curls or flat, lifeless waves, your Revlon hair dryer diffuser might be the game-changer you have been missing. Designed to enhance natural texture while reducing drying time, the Revlon hair dryer diffuser helps lift roots, define curls, and prevent frizz without the harshness of direct airflow. Whether you are new to styling curly hair or just unsure how to get the most from your diffuser, this guide walks you through every step from attaching it correctly to achieving soft, bouncy results every time.
Using a diffuser is not just about snapping it onto your dryer and turning it on. Technique matters. The right settings, positioning, and timing can mean the difference between crunchy, uneven hair and salon-quality definition. You will learn how to prep your curls, section effectively, choose ideal heat and speed settings, and finish with a professional touch. Plus, we will cover maintenance tips and common mistakes so your Revlon diffuser stays effective and lasts longer.
Attach Diffuser Securely to Revlon Dryer

Before you start drying, ensure the diffuser is properly connected. A loose fit can reduce airflow efficiency and even cause it to pop off during use.
Confirm Diffuser Compatibility
Check that your diffuser matches your Revlon model. Most fit Revlon One-Step, Perfect Heat, and Essentials dryers with a 1.8-inch nozzle diameter. If using a universal diffuser, verify inner diameter compatibility, typically 1.7 to 2 inches.
Warning: Forcing an ill-fitting diffuser may damage the dryer nozzle or create unsafe heat buildup.
Choose Attachment Type
Revlon models primarily use two systems:
- Push-on: Slide over the nozzle and press firmly until snug. No twisting needed.
- Twist-lock: Insert fully, then rotate one-quarter turn clockwise until it clicks into place.
Ensure the pronged side faces outward. This distributes air gently through curls.
Test for Stability
Gently tug the diffuser after attachment. It should stay firmly in place without wobbling. If it loosens during use, reattach and check for debris or warping on the rim.
Pro Tip: Never use a damaged or warped diffuser. It compromises airflow and safety.
Prep Hair for Best Curl Definition
Great results start before you turn on the dryer. Proper prep sets the foundation for volume, shine, and long-lasting curl pattern.
Wash and Condition With Sulfate-Free Products
Begin with clean, conditioned hair. Use sulfate-free shampoo and conditioner to preserve natural oils, especially if you have curly, coily, or color-treated strands. Over-cleansing strips moisture and leads to frizz.
Towel-Dry Gently to Prevent Frizz
After rinsing, remove excess water using a microfiber towel or cotton T-shirt. Avoid regular towels. They roughen the cuticle and cause frizz. Squeeze or scrunch hair. Do not rub.
Apply Leave-In and Curl Enhancers
Layer products for hydration and hold:
- Leave-in conditioner: Apply from mid-lengths to ends.
- Curl cream: For soft definition and light volume.
- Mousse: For medium hold and bouncy texture.
- Gel: For maximum clump control and anti-frizz.
Work in small sections for even distribution.
Form Curls Before Drying
Use the praying hands method to smooth product down each section, then scrunch upward to encourage curl formation. Let curls set naturally. Do not comb or brush after applying product.
Common Mistake: Skipping scrunching leads to looser, less defined waves.
Section Hair for Even Drying Results

Diffusing all at once causes uneven drying and flat roots. Sectioning ensures every curl gets attention.
Divide Into Manageable Sections
Clip hair into 3 to 6 sections, such as front, sides, crown, and back. Start at the nape and work upward. Smaller sections mean better airflow and faster drying.
Position Curls in Diffuser Bowl
Flip head forward for root lift. Gather one section and place it into the diffuser bowl. Let curls nestle among the prongs without squishing tightly.
Visual Cue: Curls should look lifted at the roots, not compressed.
Customize Positioning by Styling Goal
Adjust technique based on your desired look.
Invert Head for Volume
Bend forward and place diffuser under roots. Lift slightly while drying for maximum bounce and lift. Hold 20 to 30 seconds per section.
Point Downward for Elongated Curls
Hold diffuser vertically, letting curls hang. Move slowly from roots to ends to smooth cuticles and reduce puffiness.
Alternate Positions for Balanced Texture
Start inverted, then finish upright. Reposition hair mid-dry to expose hidden layers and avoid flat spots.
Pro Tip: Flip and reposition curls 2 to 3 times during drying for all-over fullness.
Set Correct Heat and Speed Levels
Using the wrong settings can fry curls or leave them damp. Match your hair type to optimal Revlon dryer settings.
Use Medium Heat for Healthy Curls
Set heat to level 2 to 3 out of 5. High heat dries out curls, increases frizz, and weakens elasticity. Medium heat preserves moisture and enhances natural shape.
Common Myth: Higher heat equals faster drying. Truth: Too much heat causes damage and prolongs drying due to uneven moisture loss.
Adjust Speed Based on Hair Thickness
- Fine or damaged hair: Medium speed, level 2 to 3.
- Thick, coarse, or coily hair: High speed, level 3 to 4.
Higher airflow lifts roots and speeds drying without overheating.
Pro Tip: Start low, then increase speed as needed. You can always boost but you cannot undo heat damage.
Master Diffusing Motion and Technique
How you move the diffuser affects curl definition, volume, and frizz control.
Keep Dryer in Constant Motion
Move the diffuser left to right, up and down. Never hold it still for more than 30 seconds. Stagnant heat creates a stiff cast and dries unevenly.
Float, Do Not Press
Use a floating technique. Hover the diffuser slightly above hair or make light contact. Pressing flattens curls and kills volume.
Visual Cue: Prongs should gently lift roots, not crush them.
Dry to 80 to 90 Percent Before Air-Drying
Stop diffusing when hair is nearly dry. Let the final 10 to 20 percent air-dry to maintain softness and bounce. Over-diffusing leads to stiffness and dry ends.
Separate Inner Layers Mid-Dry
Outer curls dry first. After initial drying, gently finger-separate clumps to expose damp inner sections. Re-diffuse briefly to eliminate moisture pockets.
Avoid: Raking, combing, or disturbing curls aggressively. This breaks clumps and causes frizz.
Finish With Soft, Defined Curls
The final steps lock in definition and eliminate crunch without sacrificing shine.
Final Diffuse for Hidden Dampness
Flip head over and diffuse the underside of the crown and nape. Move hair side to side to refresh volume and ensure complete drying.
Scrunch Out the Crunch
If gel left a stiff cast, once fully cooled, scrunch curls with dry hands. Add a pea-sized drop of argan or jojoba oil to reduce stiffness while preserving shape.
Pro Tip: Always scrunch with dry hands. Wet hands reactivate gel and stretch curls.
Add Shine Without Weight
For extra polish, apply a tiny amount of serum to palms. Glide lightly over the surface. Avoid roots to prevent greasiness. Focus on ends and frizzy areas.
Result: Glossy, frizz-free curls with natural movement.
Maintain and Clean Your Diffuser
A clean diffuser performs better and lasts longer. Buildup from hair products reduces airflow and can cause odors.
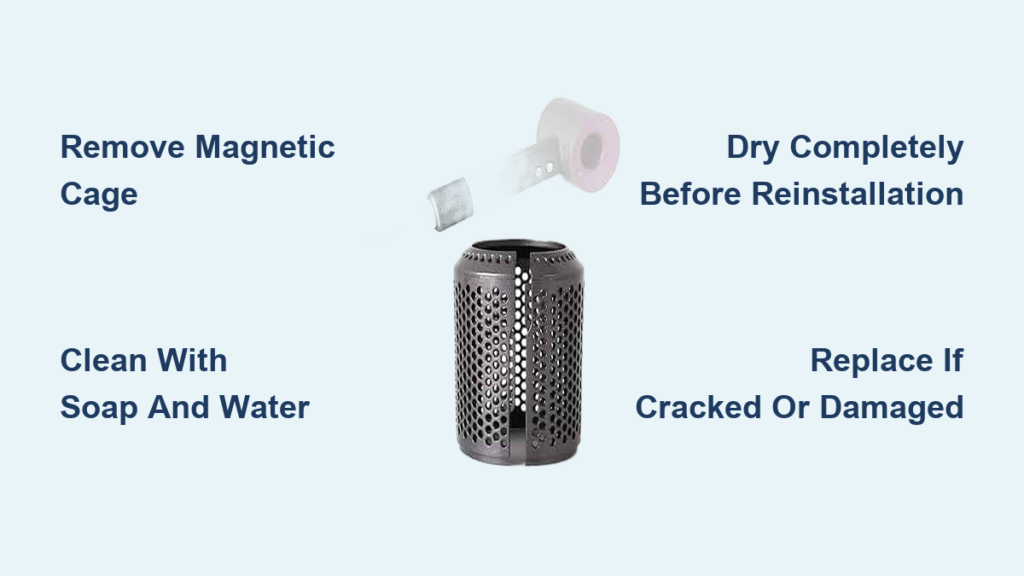
Clean Monthly to Remove Residue
- Remove from dryer and rinse under warm water.
- Use a soft toothbrush to dislodge lint and product buildup between prongs.
- Air-dry completely before reattaching.
Common Mistake: Never immerse the dryer body or attach a wet diffuser. Risk of electrical damage.
Store Properly to Prevent Warping
Store attached or separately, depending on space. Avoid stacking heavy items on the prongs. They can bend and lose effectiveness.
Pro Tip: Label your diffuser if sharing tools to prevent mix-ups.
Avoid Common Diffusing Mistakes
Even small errors can ruin your curl game. Steer clear of these frequent pitfalls.
Do Not Use High Heat
It dries out curls, increases frizz, and damages cuticles. Stick to medium heat for healthier, shinier results.
Do Not Press Down Hard
Flattens volume and disrupts curl formation. Use light, floating contact instead.
Do Not Skip Sectioning
Leaves dampness underneath and causes uneven texture. Always clip and process in parts.
Do Not Over-Diffuse
Drying 100 percent with heat leads to brittle ends. Air-dry the last 10 to 20 percent for softness.
Expert Note: Users with thick hair report best results using higher speed with multiple repositioning for full drying without frizz.
Know Your Diffuser Specs and Fit
Understanding your tool ensures compatibility and peak performance.
Check Nozzle Diameter and Model Fit
Most Revlon dryers have a 1.8-inch nozzle. Diffusers are designed to fit Revlon One-Step, Revlon Perfect Heat, and Revlon Essentials. Universal diffusers with matching inner diameter may work, but verify secure fit.
Recognize Physical Features
- Bowl size: approximately 7 to 8 inches, holds moderate sections.
- Prong length: approximately 1.5 inches, long enough to grip curls, short enough to prevent tangles.
- Material: Heat-resistant plastic, typically black or gray.
Pro Tip: Longer prongs help with thick or coily hair. Shorter ones suit fine waves.
Frequently Asked Questions About Revlon Hair Dryer Diffusers
Can I use a universal diffuser with my Revlon hair dryer?
Yes, universal diffusers with an inner diameter of 1.7 to 2 inches typically fit Revlon dryers. However, verify secure fit before use to ensure proper airflow and safety.
What heat setting should I use for diffusing curly hair?
Use medium heat, typically level 2 to 3 out of 5. High heat dries out curls and causes frizz. Medium heat preserves moisture and enhances natural curl shape.
How long should I diffuse my hair?
Diffuse until hair is 80 to 90 percent dry. Allow the final 10 to 20 percent to air-dry. This prevents over-drying and maintains softness and bounce.
Why are my curls crunchy after diffusing?
Crunchiness comes from gel or mousse that dried with a stiff cast. Once hair is fully cooled and dry, scrunch curls with dry hands or add a small amount of lightweight oil to break the cast.
Can I use the diffuser on straight or wavy hair?
Yes. The diffuser adds volume and reduces frizz for wavy hair. For straight hair, it can create gentle waves and texture when used with the inverted technique.
How often should I clean my Revlon diffuser?
Clean the diffuser monthly. Rinse under warm water, use a soft brush to remove buildup between prongs, and air-dry completely before reattaching.
Key Takeaways for Using Your Revlon Diffuser
Using a Revlon hair dryer diffuser correctly transforms your curl routine, delivering volume, definition, and lasting bounce. Attach the diffuser securely, prep hair well with sulfate-free products and curl-enhancing products, and use medium heat with smart positioning techniques. Section your hair for even drying, master the floating motion, and finish by scrunching out any crunch for soft, defined curls. Clean and store your diffuser monthly, avoid common mistakes like high heat and pressing too hard, and tailor settings to your specific hair type. With this guide, you are ready to dry smarter, not harder, and achieve salon-quality results from the comfort of your home.