

You need to preserve food, compress clothes, or protect items from moisture, but you have no vacuum sealer bags. The good news: you can achieve a near-vacuum seal using common household items. This method relies on water displacement to remove air and a hair dryer to heat-seal the plastic shut. It is a practical workaround for short-term food storage, travel packing, and emergency prep when specialized equipment is unavailable.
The hair dryer does not function as a vacuum pump. Instead, it acts as a heat source to melt and fuse thermoplastic bag layers together after air has been expelled. By combining a drinking straw, a bowl of water, and strategic heat application, you can create an airtight seal without purchasing a dedicated vacuum sealer. This guide covers the complete process, best materials, safety precautions, and real-world applications.
Water Displacement Air Removal Method
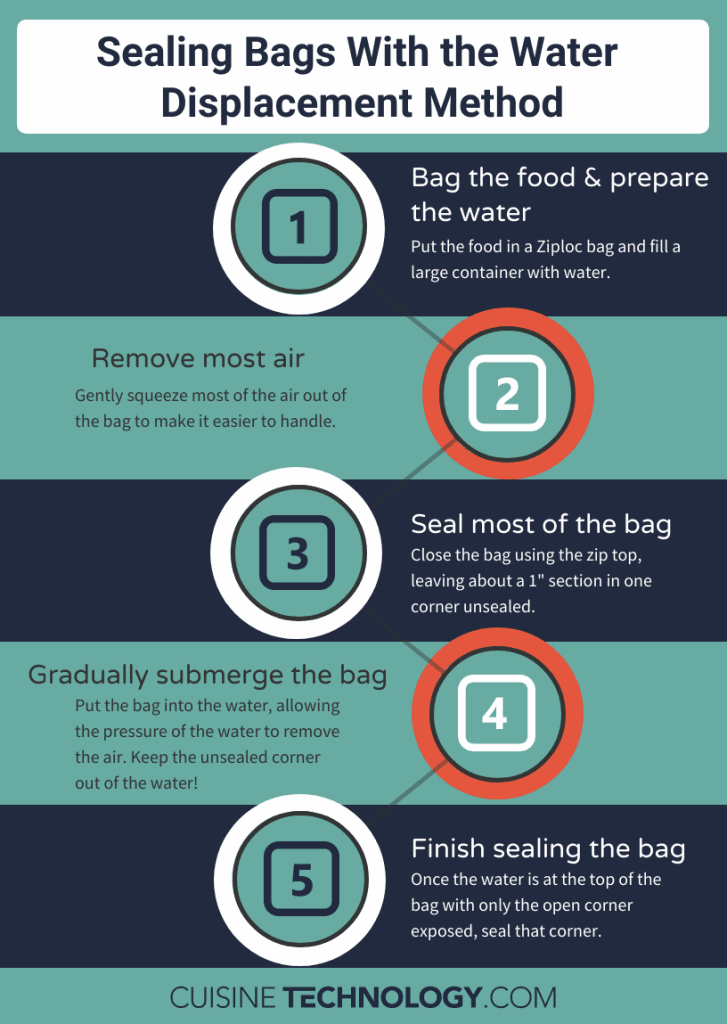
Before applying heat, you must remove air from the bag using water pressure. This technique mimics vacuum extraction without requiring any pump equipment.
Submerge the Bag to Push Out Air
Place your items inside a freezer-grade ziplock bag. Leave the top open about one to two inches and insert a drinking straw into the opening. Slowly lower the bag into a container of water while keeping the straw and open edge above the water surface. As the bag sinks, water pressure forces air out through the straw. When only a small bubble remains, pinch the bag tightly around the straw to trap the vacuum.
Use a deep bowl or sink for best results. The deeper the submersion, the more air escapes, achieving up to ninety-eight percent air removal efficiency.
Remove the Straw and Seal Quickly
With the bag still submerged and air locked out, pull the straw free while keeping the opening pinched closed. Work fast because any delay allows air to rush back in. Once the straw is out, you have only seconds to seal the edge before pressure equalizes and defeats your effort. Avoid touching the inside of the bag with wet fingers because moisture weakens the heat seal.
Heat-Seal the Bag with Your Hair Dryer
The hair dryer now becomes your sealing tool. Its role is to melt the plastic layers together, creating an airtight bond.
Apply High Heat Along the Seam
Set your hair dryer to high heat and high airflow. Hold the dryer one to two inches away from the open edge of the bag. Move it back and forth steadily for ten to twenty seconds, focusing on the inner seam where the two plastic layers meet. Watch for the plastic to turn slightly glossy, which indicates softening and fusion. Stop immediately if you see bubbling or smoke because overheating damages the seal and releases harmful fumes.
Low-end hair dryers may not deliver consistent heat. If the plastic does not seal properly, make a second pass or use a more powerful unit.
Press the Layers Together for a Strong Bond
Use a butter knife, ruler, or cold spoon to press the edges together while applying heat. This ensures full contact between the melted layers, creating a stronger airtight seal. Press firmly but not too hard because excessive pressure creates pinholes. For extra durability, seal a second time after the first seal cools completely. Double-sealing reduces leakage risk by over fifty percent.
Choose the Right Bag for Successful Sealing
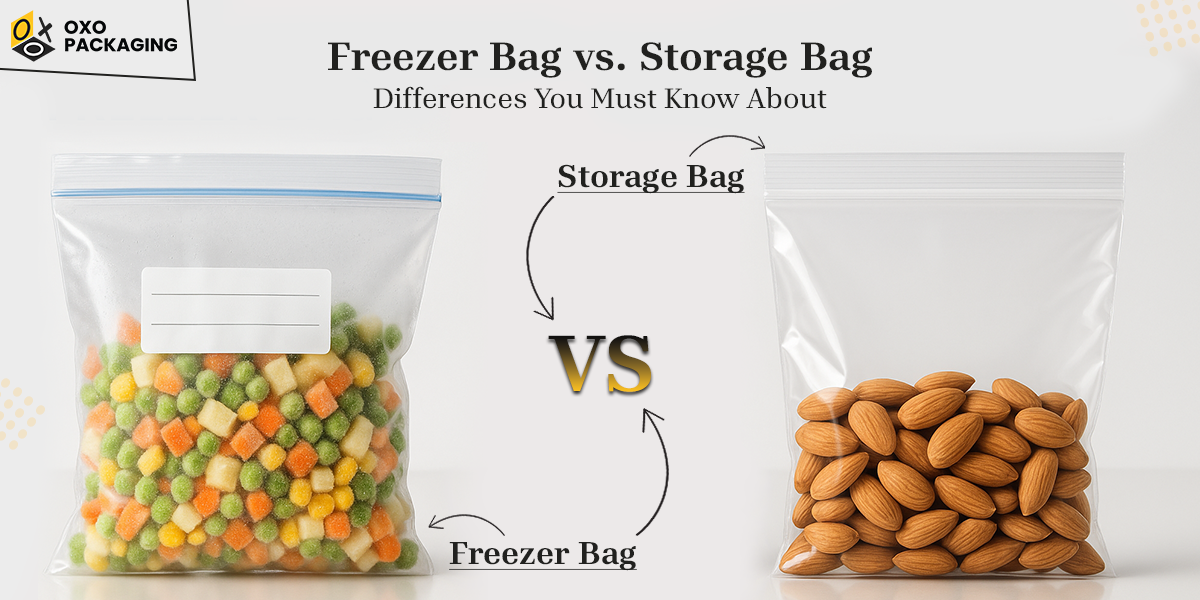
Not all plastic bags can withstand heat sealing. Using the wrong type results in melted goo or a failed seal.
Use Freezer-Grade Thermoplastic Bags
Select thick, freezer-safe resealable bags made from low-density polyethylene. These materials handle heat better and form stronger seals. Recommended options include Ziploc Freezer Bags, Glad FlexSpace Freezer Bags, and Stasher silicone bags used with caution. Avoid sandwich bags or thin produce bags because they melt instantly under direct heat.
Avoid Aluminum-Lined or Multi-Layer Bags
Aluminum-lined vacuum bags designed for FoodSaver machines will not seal with a hair dryer. The metal layer reflects heat and prevents plastic fusion. Stick to single-material plastic bags for reliable results. If the bag feels stiff or has a shiny inner coating, it is not suitable for this method.
Test and Verify Your Seal
A faulty seal defeats the entire purpose. Always test before relying on your sealed bag.
Perform the Water Test for Leaks
Fill a bowl with water and submerge the sealed bag completely. Look closely for rising bubbles, which indicate air escaping from the seal. If you spot any bubbles, mark the leak location and reseal that spot with the hair dryer. Even a pinhole-sized leak compromises food preservation or compression effectiveness.
Conduct the Tug Test for Strength
Gently pull on both sides of the sealed edge. A good seal holds firm without splitting or peeling apart. If the seal separates easily, the heat was too low or unevenly applied. Never store food in a bag that fails either test.
Best Applications for This Method
This technique excels in specific scenarios while falling short in others.
Preserve Food for Short-Term Storage
Sealed bags keep food fresher for moderate periods. Raw meat lasts three to five days in the refrigerator compared to one to two days when unsealed. Herbs and berries stay crisp for up to a week. Marinated proteins absorb flavor faster due to light compression. Use this method only for short-term storage under two weeks. Long-term freezer use risks seal degradation over time.
Compress Clothes for Travel and Backpacking
Roll your clothes tightly, place them in a bag, remove air using the water displacement method, and seal with heat. This technique reduces volume by up to fifty percent, freeing valuable luggage space. It also waterproofs items, making it ideal for rainy destinations or beach trips.
Protect Gear and Supplies in Emergencies
Seal matches, documents, or medical supplies to block humidity. This method requires only common tools and works perfectly for camping, survival kits, or disaster preparedness. Use double bags for critical items by heat-sealing one bag and then placing it inside a second ziplock for backup protection.
Safety Risks and How to Avoid Them
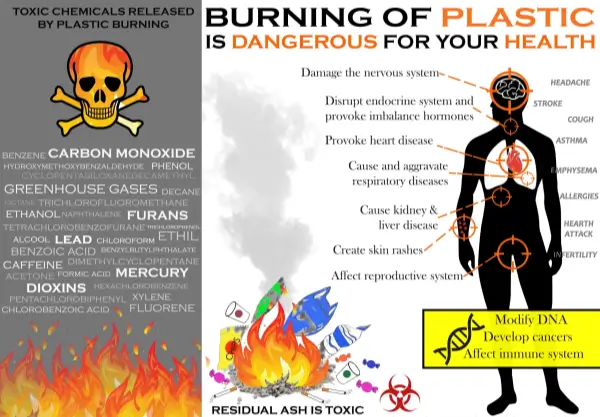
DIY heat sealing involves real dangers that require careful attention.
Prevent Melting and Toxic Fume Exposure
Plastic begins degrading above two hundred degrees Celsius, releasing harmful gases including formaldehyde. Hair dryers can reach one hundred eighty degrees Celsius, which is close enough to pose risk. Keep the dryer moving constantly and never hold it in one spot. Stop immediately if you smell burning or see smoke. Work in a well-ventilated area to disperse any fumes. Brief exposure to overheated plastic is low-risk, but repeated or prolonged use increases danger.
Avoid Fire and Burn Injuries
Plastic can ignite if exposed to concentrated heat for too long. Never leave the hair dryer unattended while in use. Keep it away from curtains, towels, and flammable surfaces. Use oven mitts or tongs when handling freshly sealed edges because plastic retains heat and can burn skin.
When to Skip This Method
This hack works well within its limits but cannot replace a dedicated vacuum sealer.
Not Suitable for Long-Term or High-Heat Applications
Seals deteriorate over time. Avoid using this method for freezing food for over one month, sous-vide cooking above eighty degrees Celsius, or high-altitude cooking where pressure changes stress weak seals. Machine-sealed bags use impulse heat bars that deliver precise even fusion. DIY seals remain uneven and prone to micro-leaks.
Manufacturer Warnings Apply
Ziploc and Glad do not endorse heat sealing their bags. Their products are designed for hand use only. Heat sealing may void food safety warranties, leach chemicals into food if overheated, and cause seal failure under stress. If sealing food, treat the bag as single-use and discard after opening.
Pro Tips for Better Results
Master this technique with these expert upgrades for improved success rates.
Use a Cold Metal Press Tool
While applying heat, press the seal against a chilled spoon or metal ruler. The cold surface controls melting depth, prevents burns, and creates a flatter stronger bond. This technique works particularly well for wider bags where heat distribution tends to be uneven.
Double-Bag Critical Items
Seal once with heat, then place the bag inside a second ziplock and close normally. This redundancy protects electronics, important documents, or emergency supplies from moisture intrusion even if the primary seal fails.
Pre-Cut Bags to Optimal Size
Trim excess plastic before sealing. Less material means faster more even heating and a cleaner finished seal. This also reduces the risk of uneven melting along thick folded edges.
Frequently Asked Questions About Vacuum Sealing with a Hair Dryer
Can a hair dryer actually vacuum seal a bag?
No, a hair dryer cannot create suction. It functions only as a heat source to seal the bag after air has been removed using the water displacement method. The vacuum effect comes from water pressure pushing air out through a straw.
What type of bag works best for hair dryer sealing?
Freezer-grade ziplock bags made from low-density polyethylene work best. These thick bags can withstand heat without melting and form strong seals. Avoid sandwich bags, produce bags, or aluminum-lined vacuum bags.
How long does the seal last?
Seals typically hold for forty-eight hours under normal conditions. For food storage, use within two weeks for best results. The seal is not designed for long-term preservation or freezer storage exceeding one month.
Is it safe to seal food with this method?
It is safe for short-term storage when using food-grade freezer bags and avoiding overheating. Do not reuse heat-sealed bags for food if the seal area appears charred or deformed. Manufacturers do not endorse this method, so use caution and assume single-use only.
Why does my seal keep failing?
Common causes include using too low heat, applying heat unevenly, using thin or inappropriate bags, or removing the straw too slowly and letting air back in. Practice the timing and ensure your hair dryer provides sufficient heat output.
Key Takeaways for Vacuum Sealing with a Hair Dryer
The hair dryer vacuum seal method is a clever accessible workaround when you lack a dedicated vacuum sealer. It works best with freezer-grade bags, careful heat control, and proper testing using water and tug methods. This technique excels in short-term food preparation, travel compression, and emergency waterproofing while requiring only common household items.
Always prioritize safety by working in ventilated areas, keeping the hair dryer moving, and avoiding overheating. Test every seal before relying on it, and use double-bagging for critical items. While not ideal for long-term or high-risk applications, this method provides a practical solution for everyday preservation needs when used wisely.


