

Trying to shape plexiglass without the right tools? You might be wondering if a hair dryer is enough to bend it. The short answer is yes, but only under strict conditions. While many DIYers attempt to bend plexiglass using a household hair dryer, success depends heavily on the material thickness, heat control, and patience. This guide reveals exactly how and when it can work, what risks are involved, and why a heat gun is usually a better choice.
Plexiglass, also known as acrylic or PMMA, becomes pliable at around 300 to 320 degrees Fahrenheit. Most hair dryers max out at 220 degrees Fahrenheit, making them significantly underpowered for this task. Still, for thin sheets under 3mm, a high-powered dryer used carefully may soften the material enough for minor bends. If you are working on a small craft project and lack a heat gun, this method could get you through. Just do not expect precision or professional results.
When a Hair Dryer Works for Plexiglass
Thin Sheets Only
A hair dryer can only soften acrylic sheets 2 to 3mm thick or less. Thicker material will not heat through its core, leading to cracks when bent. The outer surface may feel warm while the inside remains rigid, creating internal stress.
This method works for display stands, small nameplate holders, and lightweight prototypes. It fails for structural parts, thick enclosures, and tight radius curves.
Low Precision Projects Only
If your project demands exact angles or smooth curves, skip the hair dryer. Uneven heating makes clean 90 degree bends nearly impossible. This method suits rough shaping, not fine fabrication.
Pro Tip: Always test on a scrap piece first. Different brands of acrylic respond differently to heat.
Prepare Your Workspace for Safe Bending

Remove Protective Film
Before heating, peel off both sides of the plastic film. Leaving it on can cause melting, bubbling, or sticky residue that ruins the finish.
Safety First
Wear heat resistant gloves and safety goggles. Work in a well ventilated area because acrylic releases mild fumes when heated. Keep flammable materials away and have a fire extinguisher nearby.
Never use open flame. A lighter or stove can ignite the material.
Gather Your Tools
You will need a hair dryer on the highest heat setting, a non flammable bending form like a wood block or metal ruler, clamps or a jig to hold the shape, and a timer.
Heat the Plexiglass Evenly
Set Dryer to Maximum Heat
Use the highest temperature and airflow setting. Hold the dryer 2 to 4 inches from the surface. Closer risks scorching. Farther reduces effectiveness.
Focus on the Bend Line
For straight bends, heat a half inch wide strip along where the fold will occur. Move the dryer slowly and steadily back and forth. Never stop in one spot.
Use a sweep motion of 2 to 3 seconds per pass. Duration is 5 to 10 minutes depending on thickness. Watch for slight sagging or softness when gently pressed with a gloved finger.
Flip and repeat: Heat both sides of the sheet alternately for even softening.
Recognize When It Is Ready
There is no exact signal, but signs include slight drooping under its own weight, flexibility when lightly pressed, and no resistance when slowly bent.
If you see bubbling or smoke, stop immediately. This means overheating.
Bend with Support

For 90 Degree Angles
Place the heated line over the edge of a wooden block or metal ruler. Wear gloves and apply gentle, even pressure downward on both sides. Hold for 15 to 20 seconds until set.
Use clamps to lock the angle if needed.
For Curved Shapes
Wrap the softened section around a round form like a PVC pipe or wooden dowel. Ensure the form matches your desired radius.
Support the entire bend zone. Apply slow, steady pressure. Avoid kinking by guiding the material smoothly.
Cool Without Shock
Let It Set Naturally
After bending, hold the shape for 20 seconds, then let it cool at room temperature. Do not dunk in water or blow cold air. Rapid cooling causes stress cracks.
Cooling time is 1 to 5 minutes. Full rigidity returns once completely cooled.
Never force cool. Thermal shock ruins the bend.
Why a Hair Dryer Falls Short
Low Heat Output
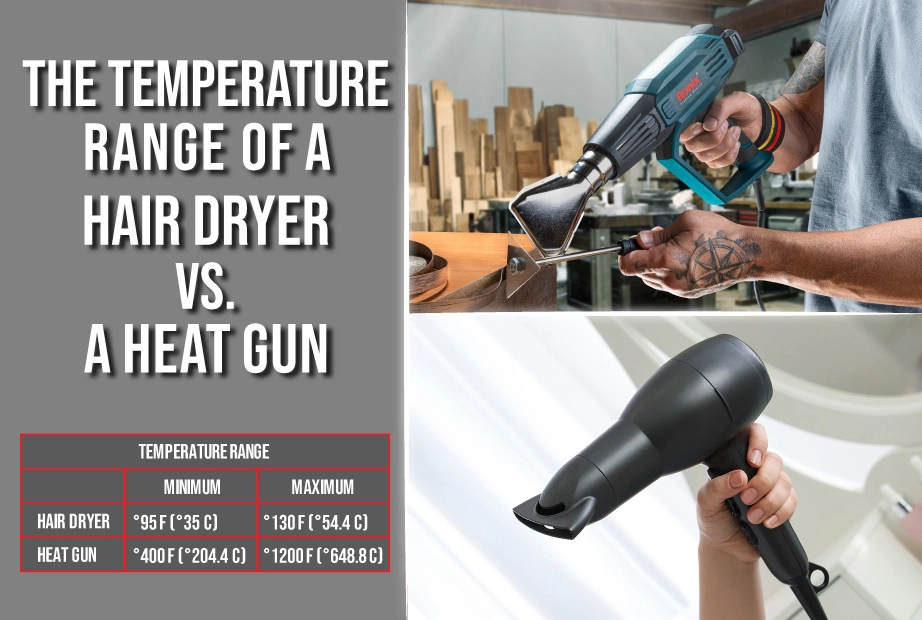
Most hair dryers reach only 150 to 220 degrees Fahrenheit, well below the 300 degrees Fahrenheit needed to properly soften acrylic. This leads to long heating times, incomplete softening, and high risk of cracking.
Poor Heat Concentration
Hair dryers blow wide, diffused air, not a focused stream. This causes hot spots that warp or bubble, cold zones that resist bending, and uneven results.
Thickness Limitations
Sheets over 3mm will not bend safely with a hair dryer. The surface may seem soft, but the core stays rigid, leading to fractures during shaping.
Common Mistakes to Avoid
Leaving Film On
Melting film sticks to the acrylic and leaves permanent marks. Always remove it before heating.
Holding Dryer Too Close
Less than 2 inches away increases scorch risk. Maintain a safe distance and keep moving.
Rushing the Bend
Bending too early or too fast causes kinks and cracks. Wait for full pliability and apply pressure gradually.
Using Open Flame
Torch or lighter methods can ignite the material. Stick to electric heat sources only.
Better Tools for the Job
Use a Heat Gun
A heat gun is the best alternative for DIYers. It reaches 1000 degrees Fahrenheit with adjustable settings, focuses heat on a narrow line, bends sheets up to half inch thick, and cuts heating time to 1 to 5 minutes.
Hold 2 to 3 inches away and sweep slowly across the bend line.
Try a Strip Heater
Designed specifically for acrylic, a strip heater heats a precise strip using heating elements. It is perfect for 90 degree bends, display cases, and boxes. It eliminates warping with even heat.
Oven Method for Curves
For large, smooth curves, preheat the oven to 275 to 300 degrees Fahrenheit. Place acrylic on a baking sheet. Heat for 10 to 15 minutes until pliable. Remove and drape over a mold immediately.
Monitor closely because overheating causes bubbling.
Repair Surface Damage
Overheating can leave discoloration, bubbles, or scorch marks. To fix this, lightly sand with 400 to 600 grit paper. For flame polishing with a butane lighter, pass the flame quickly over the edge. Never let it burn. Do this outdoors or in a ventilated space.
Finish Edges Smoothly
After bending, refine edges for a professional look. Sand with 220, 600, then 1200 grit. Wipe clean with isopropyl alcohol. Polish with acrylic cleaner or plastic polish. Optionally, flame polish for a glossy edge.
Use extreme caution with flame. Keep moving and avoid prolonged exposure.
Choose the Right Acrylic
Not all plexiglass bends the same.
Cast Acrylic
Cast acrylic is best for bending. It is heat resistant and less prone to cracking. It is more expensive but worth it for quality results.
Extruded Acrylic
Extruded acrylic is cheaper but more brittle. It has a higher risk of splitting under uneven heat. It is not ideal for hair dryer methods.
Always opt for cast acrylic when possible.
Practical Uses for Bent Plexiglass
Successfully bent acrylic can be used in display stands like menu holders and book displays, protective sneeze guards, custom tool organizers, light diffusers or covers, and model enclosures or prototypes.
Even DIY bent pieces can look professional with clean edges and proper finishing.
Hair Dryer vs Heat Gun: Which Wins
| Feature | Hair Dryer | Heat Gun |
|---|---|---|
| Max Temp | 150 to 220 F | Up to 1000 F |
| Bend Precision | Low | High |
| Thickness Limit | 3mm or less | Up to 12.7mm |
| Heating Time | 5 to 15 plus min | 1 to 5 min |
| Risk of Damage | High | Low |
| Cost | Dollar 0 if owned | Dollar 30 to 100 |
| Best For | Emergency fixes | Reliable results |
Verdict: Use a heat gun for any serious project.
Final Tips for Success
Test on Scrap First
Always trial your method on a spare piece of the same thickness and brand.
Work Slowly
Patience prevents cracks. Heat gradually and bend gently.
Use Jigs and Clamps
Support the shape during cooling for consistent results.
Avoid Humid Days
Moisture can affect heat absorption. Work in dry conditions when possible.
Store Properly
Keep acrylic flat and away from direct sunlight to prevent warping before use.
Frequently Asked Questions About Bending Plexiglass with a Hair Dryer
Can you actually bend plexiglass with a hair dryer?
Yes, but only under very specific conditions. It only works for thin sheets of 3mm or less, requires extreme patience, and produces low precision results. Most DIYers find the method frustrating and unreliable.
What temperature does plexiglass need to bend?
Plexiglass becomes pliable at 300 to 320 degrees Fahrenheit. Most hair dryers only reach 150 to 220 degrees Fahrenheit, making them significantly underpowered for proper bending.
How long does it take to bend plexiglass with a hair dryer?
Heating takes 5 to 10 minutes or longer for thin sheets. This is much slower than a heat gun, which typically takes 1 to 5 minutes. The extended heating time increases the risk of surface damage.
Is it safe to bend plexiglass at home?
It is safe when proper precautions are taken. Always work in a well ventilated area, wear heat resistant gloves and safety goggles, keep flammable materials away, and never use open flames. Have a fire extinguisher nearby just in case.
What is the best thickness for bending plexiglass with a hair dryer?
Two to 3mm thick sheets are the maximum that might work. Anything thicker will not heat through to the core, causing cracks and fractures during bending. For reliable results, use a heat gun for sheets over 3mm.
Why does my plexiglass crack when I try to bend it?
Cracking happens because the material did not heat evenly or thoroughly. The surface may feel soft while the inside remains rigid, creating internal stress. Rushing the process or bending before the material is fully pliable also causes cracks.
Key Takeaways for Bending Plexiglass with a Hair Dryer
Bending plexiglass with a hair dryer is possible but comes with serious limitations. The tool simply does not produce enough heat to properly soften acrylic, making it suitable only for very thin sheets and low precision projects. If you attempt this method, expect to spend significantly more time heating the material, test extensively on scrap pieces first, and accept that results will likely be imperfect.
For anyone who plans to work with acrylic regularly, investing in a heat gun is the smart choice. A heat gun provides reliable temperature control, handles thicker materials, and produces clean professional bends every time. The modest investment saves both time and material waste in the long run.
Your next step depends on your project needs. If you only need to make a single small bend on thin acrylic and have no other tools available, follow the procedure in this guide carefully and test first. If you value your time and want clean results, skip the hair dryer shortcut and add a heat gun to your workshop toolkit.


