

If you’ve ever struggled with frizzy, flat, or uneven blowouts, your hair dryer might not be the problem how you’re using it is. The BaByliss hair dryer isn’t just another styling tool, it’s a precision instrument designed for salon-quality results at home. Whether you’re using the BaBylissPRO Dual Ion Dryer, the multi-functional Air Wand, or another high-performance model, knowing how to use a BaByliss hair dryer properly can cut drying time in half, boost shine, eliminate frizz, and give you bouncy, long-lasting volume.
This guide walks you through every step from prepping your hair and selecting the right settings to advanced techniques like pin curls and cool-shot locking that professionals use to get flawless results. You’ll learn how to tailor your routine to your hair type, choose the right attachments, and avoid common mistakes that sabotage your style.
Choose Your BaByliss Model

BaBylissPRO Dual Ion Dryer
Built for precision and power, this model features a brushless motor that delivers strong, quiet airflow, ideal for thick, coarse, or curly hair. With three digital heat and speed settings and an on/off ionic switch, it gives you full control over your drying experience. Use it with concentrator nozzles for sleek styles or a diffuser for curls.
BaByliss Air Wand
A two-in-one styling game-changer, the Air Wand combines a hair dryer with interchangeable oval brush and straightening attachments. Its wet-to-dry capability lets you style directly from damp hair, saving time and reducing heat exposure. The curved design reaches tricky areas like the crown and nape with ease.
Nano Titanium Models
BaByliss Nano Titanium dryers typically use titanium heating elements for fast, even heat distribution. These work best for users who want quick drying without hot spots, especially on fine to medium hair.
Pro Tip: If you want salon-level polish, go with the Dual Ion. If you’re short on time and want volume or straight styles fast, the Air Wand is your go-to.
Prep Hair for Best Results
Towel-Dry Thoroughly
After washing, gently squeeze out excess water with a microfiber towel or cotton T-shirt. Avoid rubbing because this causes frizz. Your hair should be damp, not dripping, before you start drying.
Apply Heat Protectant
Always use a heat protectant spray or serum before turning on the dryer. This shields your strands from temperatures up to 450°F and prevents split ends and dryness. Spray evenly from mid-length to ends.
Add Styling Products
Choose products based on your goal.
• Volumizing mousse for lift
• Anti-frizz serum for shine
• Reparative spray for strength and bounce
Expert Note: Shake mousse cans upside-down before dispensing for a lighter, fluffier texture that won’t weigh hair down.
Section Hair Properly
Clip your hair into three to four sections: bottom (nape), sides, and top/crown. Work from bottom to top to maintain control and ensure even drying. Smaller sections equal smoother, faster results.
Set Ionic Mode Correctly
Use Ions ON for Shine and Speed
Flip the ionic switch ON to release negative ions that break down water molecules for faster drying, neutralize static and reduce frizz, and smooth the hair cuticle for maximum shine. This mode works best for coarse, frizzy, or damaged hair and sleek, polished styles.
Use Ions OFF for Volume
Turn ions OFF to preserve natural texture and body. This prevents over-smoothing, which can flatten fine or thin hair. This mode works best for fine or flat hair types, post-keratin treatments, and creating bouncy, voluminous blowouts.
Key Insight: Switching between ion modes lets you customize your style. ON for smoothness, OFF for lift.
Select Heat and Speed Settings
BaBylissPRO Dual Ion Settings
• High heat and speed: Thick, curly, or resistant hair
• Medium: Normal texture, eighty percent dry hair
• Low: Fine, delicate, or damaged hair
Use the digital display to monitor exact settings.
BaByliss Air Wand Settings
The Air Wand offers four heat levels, including a cool shot (blue LED), and three power levels. The cool setting locks in style and seals the cuticle.
Rule of Thumb: Start with medium heat and speed to pre-dry, then increase for styling once hair is eighty percent dry.
Attach the Right Tool
.jpg?sw=800&sh=800&sm=fit&strip=false)
For BaBylissPRO Dual Ion
The concentrator nozzle slides onto the main nozzle and clicks into place. It focuses airflow for precision drying. Use it with a round brush to smooth sections or create straight styles.
The diffuser spreads airflow gently and preserves curl pattern. Use it on low heat and low speed to prevent frizz. This attachment is ideal for wavy, curly, or coily hair.
The straightening pick is a fine-tooth comb with heat delivery that detangles while drying. It’s best for fine to medium hair and sleek finishes.
Safety Check: Ensure attachments are fully locked before use.
For BaByliss Air Wand
The oval brush (volumizer) connects to the bottom circular base. It adds lift, bounce, and body. Glide slowly from root to tip. At front sections, flick forward (not backward) for a natural swoop.
The straightening attachment attaches to the top circular base. It works like a flat iron while drying. The curved design reaches crown and nape. Use it on wet to dry hair with no pre-drying needed.
To switch tools, press the unlock button on the side, remove one attachment and snap in the other. Both can be used directly on damp hair.
User Benefit: This eliminates the need for multiple tools. Dry and style in one step.
Dry Hair Step by Step
Start With Pre-Drying
- Remove all attachments (use standard nozzle)
- Set to medium heat and medium speed
- Use a paddle brush to smooth hair
- Direct airflow down the hair shaft (not at roots)
- Pre-dry to eighty percent dryness. Keep slight dampness for styling.
Why It Matters: Pre-drying reduces overall heat exposure and prepares hair for tension-based styling.
Create Root Volume
- Switch to highest heat setting (hair is now eighty percent dry)
- Lift a section at the roots using a beveling motion
- Glide the tool from root to end quickly
- Focus heat at the root area to maximize lift
- Repeat for all sections
Pro Tip: For Air Wand users, use the oval brush and lift underneath the top layers to add volume away from the face.
Lock Style With Cool Shot
- Wrap the ends of each section toward the root
- Activate the cool-shot button
- Hold for eight to ten seconds to seal the cuticle
- Keep hair wrapped while cooling
- Turn off device and release
This step sets the shape, boosts shine, and ensures longer-lasting volume.
Use Pin Curls for Lasting Hold
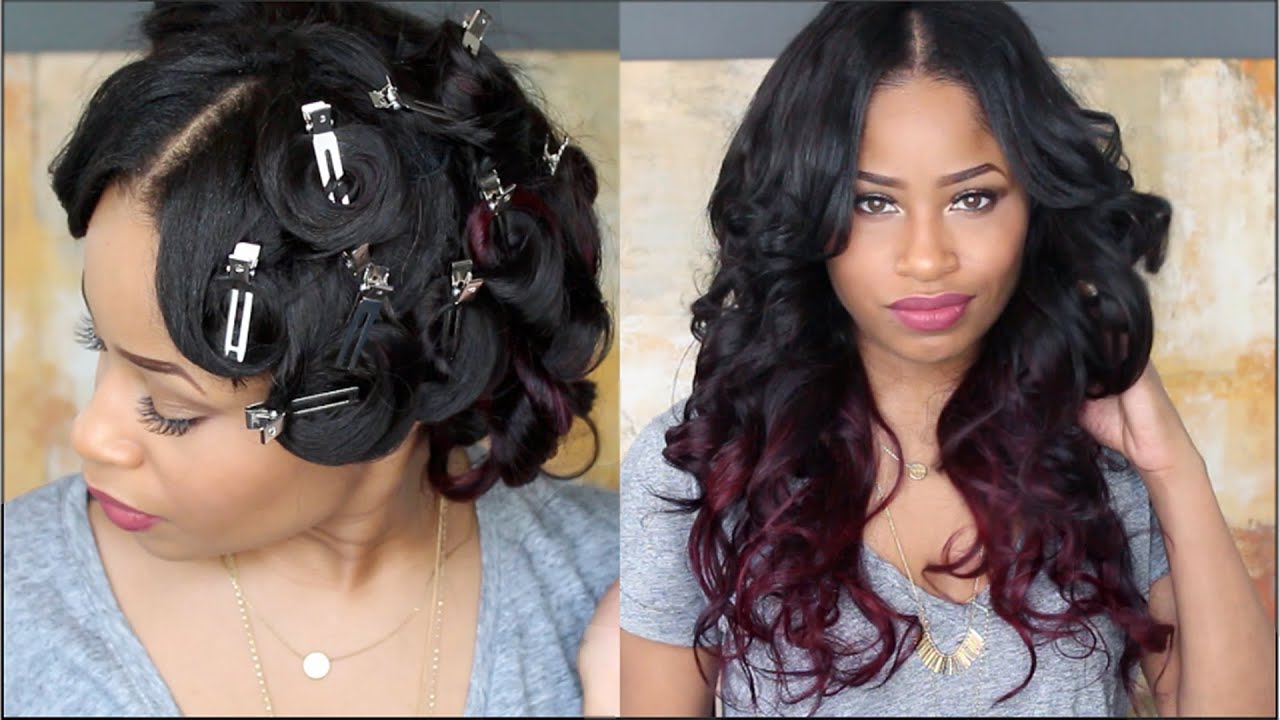
Wrap and Pin While Warm
- After cooling, wrap a section around two fingers
- Form a pin curl close to the scalp
- Immediately secure with a silver sectioning pin
- Repeat across all sections
Critical Timing: Do this immediately after cooling while hair retains heat memory.
Let Hair Set Undisturbed
Leave pins in for at least twenty minutes. This allows the hair to cool completely and lock in volume. Do not touch or adjust during this time.
Result: Soft, bouncy, salon-quality hold that lasts all day.
Finish With Final Touch-Ups
Remove Pins in Order
Start from the bottom sections and move upward. This prevents disturbing already-released curls.
Rehydrate and Shine
Mist ends with anti-frizz glaze. Apply one to two drops of serum to ends only. Avoid roots to prevent flattening.
Set the Style
Lightly mist with light-hold spray. Do not brush or comb. Use fingers only to break up the style for soft separation.
Avoid: Combs, brushes, or picks because they deflate volume instantly.
Clean and Maintain Your Dryer
Clean the Air Filter
Locate the intake filter at the back. Remove and rinse under lukewarm water. Let dry completely before reattaching. Do this every two to four weeks to maintain airflow.
Wipe Attachments
Use a damp cloth to remove product buildup. Never immerse in water.
Store Properly
Unplug and let cool before storing. Use a loose loop to wrap the cord. Do not wrap tightly. Keep in a dry, ventilated area.
Longevity Tip: Regular cleaning prevents overheating and extends motor life.
Avoid Common Mistakes
• Using high heat on wet hair. This causes steam damage and weakens strands. Always pre-dry to eighty percent before applying high heat.
• Ignoring the cool shot. Skipping this step leads to flat, frizz-prone styles. Cool air sets the cuticle and locks in shine.
• Over-drying. This leaves hair brittle and dry. Stop when hair feels smooth and dry to touch.
• Using heavy products. Creams and gels can weigh down roots. Stick to lightweight mousses and sprays.
• Brushing after styling. This destroys volume and disrupts the set. Use only fingers to separate curls or waves.
Maximize Performance by Hair Type
.jpg?sw=1200&sh=1200&sm=fit)
Fine or Flat Hair
Use Ions OFF to preserve volume. Apply volumizing mousse at roots. Use low heat and focus on root lifting. Avoid heavy serums.
Thick or Coarse Hair
Use Ions ON for frizz control. Use high heat and speed. Pre-dry to fifty to sixty percent if using Air Wand attachments. Use concentrator nozzle for control.
Curly or Wavy Hair
Use diffuser on low heat. Dry in sections to preserve curl pattern. Scrunch gently with hands. Avoid brushing when wet.
Keratin-Treated Hair
Use Ions OFF to prevent flattening. Use low to medium heat. Avoid direct airflow on roots. Let hair air-dry fifty percent before using dryer.
Safety Tips and Warnings
• Always use heat protectant before styling
• Do not use near water (sinks, bathtubs)
• Keep away from open wounds or scalp injuries
• Unplug after use
• Avoid continuous use over thirty minutes on high heat
• Store in a dry, cool place
• Do not wrap cord tightly around the dryer
Frequently Asked Questions About Using a BaByliss Hair Dryer
What is the best BaByliss model for beginners?
The BaByliss Air Wand is best for beginners because it offers wet-to-dry capability and combines drying with styling in one tool. Its intuitive design and interchangeable attachments make it easy to achieve professional results without multiple tools.
How do I reduce frizz when using my BaByliss dryer?
Turn the ionic switch ON to release negative ions that break down water molecules and smooth the hair cuticle. Always use a heat protectant and direct airflow down the hair shaft rather than at the roots.
Can I use the BaByliss Air Wand on completely wet hair?
Yes, the Air Wand features wet-to-dry capability. You can style directly from damp hair without pre-drying. For thick or curly hair, pre-dry to fifty to sixty percent first for best results.
How often should I clean my BaByliss hair dryer?
Clean the air filter every two to four weeks to maintain airflow and prevent overheating. Wipe attachments after each use to remove product buildup.
What setting should I use for fine hair?
Use Ions OFF to preserve volume. Select low heat and low speed. Focus on root lifting rather than high heat, which can damage fine strands.
How do I create maximum volume with my BaByliss dryer?
Use Ions OFF, apply volumizing mousse at the roots, and use the oval brush attachment (Air Wand) or a round brush (Dual Ion). Lift underneath the top layers and flick forward at front sections. Finish with a cool shot to lock in volume.
Key Takeaways for Perfect BaByliss Styling
With the right technique, your BaByliss hair dryer can deliver twice the shine, twice the smoothness, and half the drying time of ordinary dryers. The key lies in proper preparation (towel-dry, apply heat protectant, section hair), correct settings (Ions ON for smoothness, Ions OFF for volume), and professional methods like cool-shot sealing and pin curls.
Whether you’re using the Dual Ion for precision drying or the Air Wand for fast, multi-functional styling, follow this guide to unlock your dryer’s full potential. In just a few minutes a day, you can achieve a blowout that lasts for days. No salon visit required.
Final Note: Consistency is everything. The more you practice sectioning, tension control, and cool-shot timing, the better your results will become. Keep this guide handy until the steps become second nature, and enjoy the confidence of perfectly styled hair every single day.


