
Tired of expensive salon visits and harsh commercial depilatory creams? You are not alone. Many people are searching for how to make hair removal cream at home as a natural, affordable alternative to chemical-laden products. These DIY formulas use kitchen ingredients like turmeric, sugar, papaya, and gram flour to gently remove unwanted hair while nourishing your skin. Unlike store-bought creams that rely on strong alkaline compounds, homemade versions work with your body, reducing irritation and supporting gradual hair reduction.
In this guide, you will discover 13 proven homemade hair removal recipes, which ones suit your skin type, and crucial safety tips to avoid irritation. Whether you are targeting facial hair, underarms, or legs, there is a recipe here for you.
Why Make Your Own Hair Removal Cream
Homemade hair removal creams offer significant advantages over commercial products. You gain full control over every ingredient, eliminating exposure to synthetic chemicals like thioglycolates and parabens often found in depilatory creams. This matters especially if you have sensitive skin that reacts to commercial formulations.
These natural alternatives provide multiple skincare benefits beyond hair removal. Many recipes exfoliate dead skin cells, brighten your complexion, and moisturize simultaneously. Ingredients like turmeric reduce inflammation, papaya enzymes break down hair protein, and aloe vera soothes while healing. You also reduce environmental impact by avoiding single-use plastic packaging.
The cost savings are substantial. Most recipes use ingredients already in your pantry, costing less than ten cents per application compared to several dollars for commercial creams or salon treatments. With consistent use, you may also notice slower hair regrowth and thinner, softer hair over time.
Choose the Right Recipe for Your Skin Type
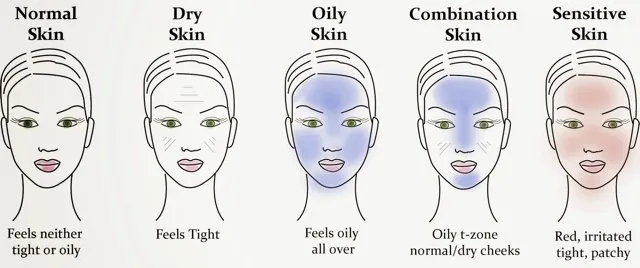
Matching the formula to your skin type and target area ensures effectiveness without irritation. Not all homemade creams work equally well for every skin type or body part.
Match Recipes to Skin Sensitivity
Sensitive skin requires gentle ingredients. Avoid lemon juice, alum, or baking soda if you are prone to redness or irritation. Instead, opt for soothing blends like rosewater and gram flour or oatmeal and banana, which exfoliate without causing stinging. For oily or resilient skin, stronger exfoliants like coffee and baking soda or toothpaste mixes can deliver deeper results.
Dry skin benefits from moisturizing agents. Try alum with rosewater and olive oil. The alum slows regrowth while rosewater soothes and olive oil hydrates post-treatment. Combination skin can handle a wider range, such as turmeric and milk or papaya and turmeric, which balance exfoliation and nourishment effectively.
Target Specific Areas Effectively
Facial hair responds best to mild, brightening formulas. Turmeric and milk, egg white and cornstarch, or gelatin and milk work well for fine facial hair while tightening pores and reducing pigmentation. For underarms, alum-based solutions are popular for their hair-thinning effects over time. Legs and bikini lines tolerate stronger treatments like sugar wax or beeswax-based pastes, which remove hair from the root for longer-lasting smoothness.
Avoid acidic or abrasive mixes on freshly shaved or broken skin. Never use lemon juice or baking soda near the bikini line if irritation is present. Stick to post-shave healing with aloe vera and papaya, which soothe and gently exfoliate without causing discomfort.
Make a Brightening Turmeric Hair Removal Cream
Turmeric is a powerhouse for skin brightening and hair reduction. This simple cream works well on facial hair and pigmented areas like the upper lip, chin, and arms.
Mix Turmeric and Baking Soda
Combine 1 tablespoon of turmeric powder with 1 tablespoon of baking soda in a small bowl. Gradually add water while stirring until you achieve a smooth, spreadable paste. Apply it evenly to clean, dry skin using your fingers or a soft brush.
Gently massage in circular motions and leave the paste on for 15 to 20 minutes. Rinse thoroughly with lukewarm water and pat dry. This blend uses turmeric is anti-inflammatory properties to calm the skin while slowing hair regrowth. Baking soda acts as a mild abrasive, softening hair shafts and loosening follicles for easier removal.
Prevent Skin Staining
Turmeric can temporarily stain light skin or fabrics. To minimize this, use less turmeric or mix it with milk or yogurt instead of water. Apply the mixture at night and wash it off in the morning. Wear old clothes or a towel around your shoulders during treatment.
Rinse immediately if you notice yellowing on your skin. For sensitive skin, replace baking soda with gram flour to reduce abrasiveness while maintaining effectiveness.
Create a Whitening Coffee and Baking Soda Paste
This exfoliating blend removes fine hair while improving skin texture and brightness. It is ideal for arms, legs, and back.
Prepare the Exfoliating Mix
Mix 2 tablespoons of used coffee grounds with 1 tablespoon of baking soda. Add water gradually to form a thick paste. Apply to damp skin using circular motions, focusing on areas with coarse or dark hair. Let it dry completely, then wash off with warm water.
Coffee grounds provide physical exfoliation, lifting dead skin cells and loosening hair at the surface. The caffeine content may also inhibit hair growth over time by disrupting follicle activity. Baking soda enhances this effect by softening keratin, the protein that makes up hair.
Boost Circulation and Brighten Skin
Regular use improves blood flow and fades pigmentation. The scrubbing action helps prevent ingrown hairs by keeping pores clear. For added hydration, follow up with coconut oil or aloe vera gel after rinsing.
Use this paste twice a week. Overuse can cause dryness or micro-tears in the skin, especially on thinner areas like the inner thighs. Store leftover coffee grounds in the refrigerator for up to 3 days if not used immediately.
Use Gram Flour and Rosewater for Sensitive Skin
This gentle mask is perfect for dry or reactive skin types seeking a non-irritating hair removal option.
Apply the Soothing Besan Paste
Mix gram flour with rosewater until you get a smooth, creamy consistency. Apply it evenly to the face or body. Let it dry completely, which usually takes 15 to 20 minutes. Once dry, gently rub it off in the direction opposite to hair growth using your fingertips.
Gram flour naturally exfoliates, lifting fine hair and dead skin without harsh chemicals. Rosewater balances pH, reduces redness, and adds hydration. Together, they leave skin soft, radiant, and less prone to breakouts. This combination is particularly effective for facial hair reduction in women with hormonal growth patterns.
Calm Skin After Use
If mild redness occurs, apply ice cubes wrapped in a clean cloth to soothe inflammation. Finish with a light moisturizer like almond oil or an unscented lotion. Avoid using this paste on broken or sunburned skin.
Ideal for weekly use, this method can lead to visibly thinner regrowth after 6 to 8 weeks of consistent application.
Try an Egg White Facial Hair Remover
This peel-off mask removes fine facial hair like a natural wax without the pain.
Whip and Apply the Egg Mixture
Beat 1 egg white until frothy. Add 1 tablespoon of cornstarch and mix into a sticky, stretchy paste. For extra grip, you can add 1 tablespoon of sugar. Apply a thin layer to clean, dry skin, commonly on the chin, cheeks, or upper lip.
Let it dry completely for 15 to 20 minutes. Once hardened, gently peel it off in the direction opposite to hair growth. Rinse any residue with water and moisturize immediately. The egg white forms a tight film that traps fine hairs, pulling them out upon removal.
Minimize Discomfort and Redness
Some users experience mild tugging or redness. To reduce irritation, patch test first on the jawline. Apply a thin layer, as thick applications increase discomfort. Use only once or twice a week to avoid over-stripping the skin.
Do not use this method if you have active acne or rosacea. The drying effect may worsen inflammation.
Slow Hair Growth with Alum and Rosewater
Alum is a traditional ingredient known for weakening hair roots and reducing regrowth over time. This method works especially well for underarms.
Prepare the Alum Solution
Dissolve alum powder in rosewater by stirring well. Dip a cotton ball into the solution and apply it to underarms or other target areas in thin layers. Allow each layer to dry before reapplying, and repeat for 50 to 60 minutes total. Rinse off with warm water.
This method requires patience but delivers cumulative results. Alum is astringent properties shrink pores and weaken hair follicles, leading to sparser, finer regrowth after several weeks of consistent use.
Moisturize to Prevent Dryness
Post-treatment, massage a few drops of olive oil into the skin. This counters alum is drying effect and restores moisture. Avoid using on freshly shaved or irritated underarms.
Best used 2 to 4 times per week. Do not combine with deodorants immediately after application. Wait at least an hour to prevent stinging.
Make a Papaya and Aloe Vera Hair Inhibitor
This enzyme-rich cream targets hair structure and promotes skin healing. It is perfect for full-face or body use.
Blend the Enzyme-Active Paste
Mash ripe papaya into a smooth paste. Add fresh aloe vera gel, 1 tablespoon of gram flour, and 1 teaspoon of mustard oil. Mix thoroughly until uniform. Apply to the desired area and let it dry completely.
Papaya contains papain, an enzyme that breaks down keratin in hair, weakening follicles and slowing regrowth. Aloe vera soothes and accelerates skin repair. Mustard oil enhances ingredient penetration, while gram flour exfoliates dead cells.
Remove and Nourish the Skin
After drying, gently rub off the paste with a cotton towel in the opposite direction of hair growth. Rinse with water and apply a few drops of olive oil to nourish the skin.
Use twice a week for best results. Avoid sun exposure afterward, as papaya can increase photosensitivity.
Create a Reusable Beeswax Hair Removal Cream
This natural wax alternative mimics salon treatments with zero synthetic additives. It works well for legs, arms, and bikini lines.
Melt and Combine Natural Waxes
In a double boiler, melt equal parts beeswax and rosin. Add coconut oil and a few drops of vitamin E oil. Stir until fully blended. Remove from heat and let cool slightly until it thickens into a wax-like consistency.
Beeswax provides structure, rosin boosts adhesion, coconut oil prevents irritation, and vitamin E supports healing. This mixture can be stored and reused multiple times when kept in an airtight container.
Apply and Remove Like Salon Wax
Scoop a small amount and spread it thinly on the skin in the direction of hair growth. Press a cloth strip over it and pull quickly in the opposite direction. Repeat as needed across the entire treatment area.
Perform every 3 to 4 weeks based on hair regrowth. Always patch test first, as rosin can cause allergic reactions in rare cases.
Whip Up a Sugar Wax for Natural Hair Removal
This edible, all-natural wax removes hair from the root. It is great for large areas like legs and arms.
Cook the Sugar, Lemon, and Water Mix
In a saucepan, combine 2 cups sugar, a quarter cup lemon juice, and a quarter cup water. Heat on medium, stirring constantly, until it turns amber and reaches a honey-like consistency, which takes about 10 to 15 minutes. Remove from heat and let cool slightly.
The citric acid in lemon juice may also weaken hair over time, enhancing long-term results. The sugar creates a sticky wax that adheres to hair rather than skin, reducing pain compared to traditional waxes.
Apply and Strip for Smooth Skin
Using a spatula, apply the warm wax in the direction of hair growth. Press a cloth strip on top, smooth it down, and pull quickly against hair growth. Reheat and reuse the wax as needed for larger areas.
Store leftover wax in an airtight jar at room temperature for up to 2 weeks. Reheat before each use. Avoid using on sunburned or broken skin.
Try Turmeric and Milk for Pigmentation
This soothing paste combines hair reduction with skin lightening. It is ideal for facial use on the face, arms, or neck.
Mix and Apply the Milk-Based Paste
Combine 2 tablespoons turmeric powder with 1 tablespoon milk or a milk substitute like almond or coconut milk. Stir into a smooth paste. Apply to areas with unwanted hair and let dry for 15 to 20 minutes.
Gently rub off in circular motions and rinse with lukewarm water. Milk is lactic acid exfoliates and softens hair, while turmeric reduces inflammation and slows regrowth. Over time, this combination helps fade tan and dark spots.
Limit Frequency for Sensitive Skin
Use 2 to 3 times per week. If you experience dryness, reduce to twice weekly. Always moisturize after rinsing.
This method is not recommended for acne-prone skin due to potential clogging from milk fats.
Use Toothpaste for Fast Hair Removal
This quick-fix paste removes hair and offers a cooling sensation. It is best for underarms and bikini line.
Mix Toothpaste, Baking Soda, and Lemon
Combine 1 tablespoon white toothpaste, 1 tablespoon baking soda, and 1 teaspoon fresh lemon juice. Stir into a creamy paste. Apply to clean, dry skin in a thin layer. Wait 5 to 10 minutes, and never exceed this time.
The menthol in toothpaste cools the skin, baking soda exfoliates, and lemon juice breaks down keratin. A mild bleaching effect also lightens residual hair over time.
Rinse and Moisturize Immediately
Use a damp soft cloth to rub off in circular motions. Rinse thoroughly and apply aloe vera or coconut oil. Never leave on longer than 10 minutes, as risk of irritation increases significantly.
Avoid on the face, broken skin, or after shaving. Use once every 5 to 7 days maximum.
Follow Safety Rules to Prevent Irritation
Even natural ingredients can cause reactions. Following these steps keeps you safe while achieving results.
Always Do a Patch Test
Apply a small amount to your inner forearm or behind the ear. Wait 24 hours. If redness, itching, or swelling occurs, discontinue use immediately. This step is non-negotiable, even for mild recipes.
Some people may be allergic to seemingly harmless ingredients like papaya or gram flour. Patch testing prevents unpleasant surprises.
Avoid Sun After Acidic Treatments
Citrus-based formulas using lemon or sugar wax increase photosensitivity. Avoid direct sun for 24 to 48 hours. Always wear SPF 30 or higher mineral sunscreen if going outside.
This precaution prevents sunburn, hyperpigmentation, and long-term UV damage to treated skin.
Never Use on Broken Skin
Do not apply any paste to cuts, acne, rashes, or sunburn. This can cause pain, infection, or scarring. Wait until skin heals completely before resuming treatment.
Expect Gradual, Lasting Results
Homemade creams will not deliver instant permanence, but consistency pays off with real, visible changes.
See Changes in 4 to 8 Weeks
With regular use 1 to 3 times weekly, most users notice slower hair regrowth, thinner and softer hair, smoother and brighter skin, and reduced pigmentation in treated areas.
Results depend on hair type, skin sensitivity, and hormonal factors. Coarse hair may require a longer commitment to see significant changes.
Maintain with Regular Use
These creams work best as part of a consistent routine. Combine with gentle exfoliation 2 to 3 times weekly to prevent ingrown hairs and boost effectiveness.
Keep track of which recipes work best for your skin and hair type. Personalization leads to the best long-term results.
Frequently Asked Questions About Making Hair Removal Cream at Home
Can I use these creams on sensitive skin?
Yes, but choose carefully. Gram flour and rosewater, oatmeal and banana, or papaya and aloe vera are the gentlest options. Always perform a patch test first and avoid acidic ingredients like lemon juice or baking soda on sensitive areas.
How long do homemade hair removal creams last?
Most recipes provide temporary results lasting several days to two weeks, depending on the treatment area and hair growth rate. Unlike laser or electrolysis, these methods do not offer permanent removal. However, consistent use over 4 to 8 weeks can lead to slower regrowth and thinner hair.
Are these methods safe for facial hair?
Yes, mild formulas like turmeric and milk, egg white and cornstarch, or gelatin and milk work well for facial hair. Avoid strong formulas like toothpaste mixes or alum on facial skin. Always patch test and use gentle, soothing ingredients around the face.
Can I store leftover hair removal cream?
Sugar wax and beeswax-based creams can be stored for up to 2 weeks in an airtight glass jar. Most other recipes, especially those containing egg, milk, or banana, should be made fresh each time. Perishable ingredients can harbor bacteria if stored.
Do these creams actually work for hair removal?
Yes, they do. These methods work through exfoliation, enzyme action, or wax-like adhesion to remove hair from the skin surface or root. They are less potent than commercial depilatory creams but safer and more natural. Results vary based on hair thickness and consistency of use.
What is the best recipe for beginners?
Turmeric and baking soda or gram flour and rosewater are excellent starting points. Both are simple to prepare, use minimal ingredients, and work well for beginners. Start with the gentler option and patch test before applying to larger areas.
Key Takeaways for Making Hair Removal Cream at Home

Making hair removal cream at home is a safe, cost-effective way to manage unwanted hair naturally. With the right recipe matched to your skin type, you can reduce regrowth, brighten skin, and avoid harsh chemicals, all using ingredients from your kitchen.
Start with a patch test for every new recipe to ensure your skin tolerates the ingredients well. Choose gentler formulas like gram flour and rosewater for sensitive areas, and reserve stronger options like sugar wax or toothpaste mixes for resilient areas like legs and underarms.
Be patient and consistent. Most users see noticeable improvements in 4 to 8 weeks with regular application. Combine your chosen method with gentle exfoliation and proper moisturization for the best results.
Avoid sun exposure after using acidic or enzyme-based treatments, and never apply any homemade cream to broken or irritated skin. With the right approach, you will enjoy smoother, healthier skin without the salon price tag.