
Your hair dryer suddenly stops working. No heat, no fan, or it shuts off mid-blowout. Before tossing it in the trash, consider this: most hair dryer problems are fixable with basic tools and a little know-how. Whether it is a clogged filter, a blown thermal fuse, or a failed heating element, diagnosing and repairing your hair dryer can save you money and extend the life of a trusted tool. If the dryer has sentimental value, the effort means even more.
This guide walks you through real troubleshooting steps, component testing, and safe DIY repairs. You will learn how to identify the exact issue, test critical parts with a multimeter, and make lasting fixes without guesswork. No fluff, no filler: just actionable repair strategies that work.
Diagnose the Problem First
Before opening the casing, pinpoint the exact failure mode. Misdiagnosis wastes time and increases risk during repair.
Identify the Symptom Accurately
Ask yourself what the dryer does or does not do when powered on. The symptoms guide your diagnosis.
Fan runs but no heat points to the heating element or thermal fuse. No power at all suggests a power cord issue, failed switch, or tripped GFCI plug. Shuts off after thirty seconds typically means overheating from a clogged intake or failing thermal protection. Only low speed works indicates a faulty diode or switch contact.
Plug the dryer into a different outlet to rule out tripped breakers or GFCI outlets first.
Listen, Smell, and Look
Use your senses to gather clues about what failed inside the dryer.
Smell burnt plastic. This indicates internal components may be damaged. Hear a hum but no fan spin. The motor is seized or disconnected. See discoloration near the heater. Burnt wiring or a failed element is likely the cause.
If you notice smoke, sparks, or melted plastic, stop immediately. Do not attempt repair. Replace the unit instead.
Fix Clogged Air Intake Filter
A blocked air filter is the number one cause of overheating and unexpected shutdowns in hair dryers.
Why It Fails
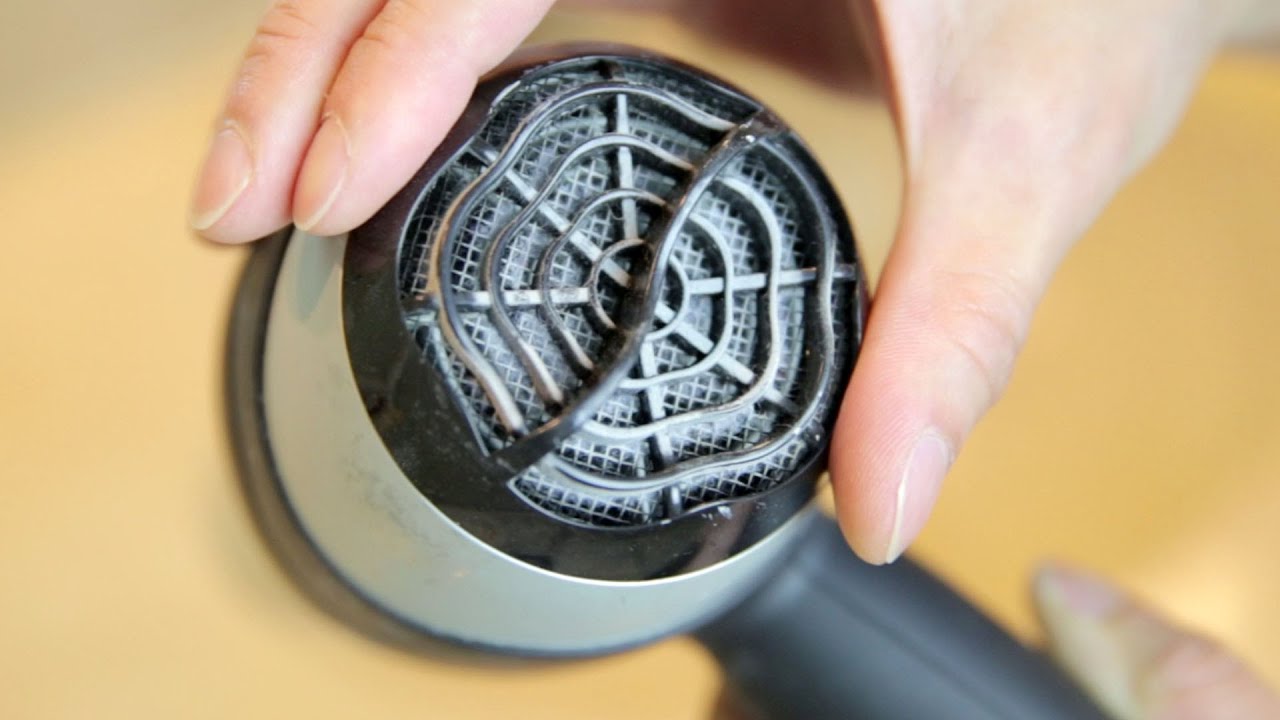
Lint, hair, and dust accumulate on the rear mesh intake, restricting airflow. This causes reduced performance, overheating, and premature thermal fuse blowout. Check the other end where the dryer draws cool air. There should be fine mesh back there and sometimes it gets clogged with lint.
Clean the Filter Properly
Tools needed include a soft brush, compressed air, and water if the filter is washable.
Unplug the dryer. Locate the rear intake grill, usually on the handle base. Remove any screws or clips securing the cover. Brush out debris with a detailing brush. Rinse under water only if the filter is labeled washable. Let dry completely, overnight is recommended. Reassemble and test.
Even if the surface looks clean, lint hides behind the mesh. Probe deeper with a toothpick or plastic spudger to remove hidden buildup.
Free a Stuck Fan or Motor
No airflow despite power? The fan may be jammed and preventing the motor from spinning properly.
Test for Seizure
Unplug the dryer. Open the casing following the disassembly steps later in this guide. Locate the fan blades attached to the motor shaft. Try to rotate them manually with a plastic tool.
If the fan is stuck, gently wiggle it back and forth to free it. If it moves freely, apply one drop of silicone-based lubricant to the shaft. Never use oil. Oil attracts dust and degrades plastic components over time.
Diagnose Motor Failure
If the motor hums but will not spin, set your multimeter to continuity mode. Touch the probes to the motor terminals. An OL reading means the motor is dead and requires replacement.
Motors in budget hair dryer models are rarely replaceable. Consider a donor-swap repair instead.
Replace a Blown Thermal Fuse
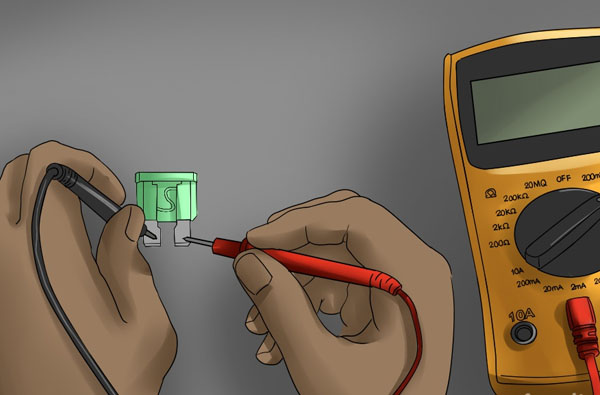
No power reaching the dryer? The thermal fuse may have tripped and cut off electricity to protect the unit.
What It Does
The thermal fuse is a one-time safety device that cuts power when temperature exceeds safe limits, typically 156°C, 170°C, or 210°C. It is not resettable. Once blown, it must be replaced.
Locate and Test the Fuse
Unplug the dryer. Open the casing and find the fuse. It is a small white or black cylinder usually located near the heating element. Disconnect one lead from the fuse. Set your multimeter to continuity mode. Probe both ends of the fuse.
No beep means the fuse is blown. Replace it with a new one matching the exact temperature rating printed on the original.
Replace Correctly
Match the temperature rating exactly, as printed on the fuse. Solder the new fuse in place. Use heat shrink tubing to insulate the connections. Never bypass the fuse. It is a fire hazard and exists specifically to prevent electrical fires.
Fix No Heat: Test the Heating Element
The fan works but the air stays cold? The heating element is likely dead and not producing warmth.
Types of Heating Elements
Hair dryers use two main types of heating elements. Wire coil elements are found in older models and are prone to breaking. PTC ceramic elements are self-regulating, safer, and longer-lasting.
Test with a Multimeter
Disconnect the power leads to the element. Set your meter to resistance mode, labeled as ohms. Touch the probes to the element terminals.
Expected resistance falls between 10 and 50 ohms, depending on the wattage. Infinite resistance, displaying OL, indicates an open circuit and means the element must be replaced.
Replacement heating elements are available online for many common models.
Replace the Element
Unscrew or unclip the old heating element. Transfer the wiring to the new element exactly as it was connected before. Reinstall and test the dryer.
Some PTC modules simply plug in. Others require soldering for secure connection.
Diagnose Power Switch or Control Board Issues
Only some settings work while others fail? The switch or circuit board is failing and needs attention.
Common Failures
Mechanical switches develop carbon buildup on contacts over time. Circuit boards can have cracked solder joints or burnt traces, especially in digital models like those from Dyson.
Test the Switch
Set your multimeter to continuity mode. Probe the switch terminals in each position, including low heat, high heat, and cool shot settings. No continuity in one setting indicates a faulty switch.
Repair Options
Mechanical switches can be replaced with a new module found on Amazon or eBay. PCB-based controls may be repaired by reflowing solder joints with a soldering iron. Digital models often require professional repair due to their complexity.
Search YouTube or iFixit for model-specific guides before starting any repair.
Check Power Cord and GFCI Plug
Intermittent power or no power at all? The cord or plug may be damaged internally.
Perform a Wiggle Test
Plug in the dryer. Turn it on. Gently bend the cord near the plug and handle. If the power flickers, a broken wire inside the cord is the cause.
Test Continuity
Unplug the dryer. Set your multimeter to continuity mode. Test each wire from the plug to the internal connection point. No signal means the cord must be replaced.
Reset GFCI Plug
Some dryers have built-in GFCI protection. Press the RESET button before proceeding with disassembly. This step is often overlooked but fixes no-power issues instantly.
Disassemble Your Hair Dryer Safely
Do not break your dryer while trying to get inside it. Follow proper disassembly procedures.
Tools You Need
Gather these tools before starting. You will need a Phillips #00 or #1 screwdriver, a plastic pry tool like an iFixit opening tool, tweezers, a multimeter, and a soldering iron for replacements.
Step-by-Step Opening
Always unplug the dryer first. Remove the screws, which are often hidden under rubber grips, labels, or the rear cap. Some models use tamper-proof screws like tri-wing or Pentalobe types. Separate the casing using a plastic tool to release the clips. Avoid metal tools that can scratch or short circuits. Take photos at each step. Label wires if you disconnect them during repair.
Newer models from Dyson and Shark may be glued. Opening can permanently damage the housing, so proceed with caution.
Test Key Components with a Multimeter
Use these tests to isolate the exact fault in your hair dryer.
| Component | Test Mode | Expected Result |
|---|---|---|
| Thermal Fuse | Continuity | Beep indicating closed circuit |
| Heating Element | Resistance | 10 to 50 ohms |
| Motor | Continuity | Beep, not OL |
| Power Cord | Continuity | Beep across each wire |
| Switch | Continuity | Beep when pressed in each position |
Always disconnect at least one lead before testing to avoid false readings from parallel circuits.
Use a Donor Model for Severe Damage

When damage is extensive, swap internals from a working identical model to save your dryer.
When to Try This
Consider donor-swap repair when voltage burnout occurs, such as plugging a 110V dryer into a 230V outlet. It also applies when melted insulation is present or when replacement parts are unavailable.
How to Do It
Buy an identical or compatible model from eBay or Facebook Marketplace. Remove the working internals from the donor unit. Install them into your original casing. Preserve the sentimental exterior while restoring function.
Avoid Dangerous Repairs
Some issues are not worth the risk. Know when to stop and replace instead.
Red Flags: Do Not Repair
A burning smell indicates an internal short or melted insulation. Sparks or smoke mean live arcing or component failure. A grinding noise suggests the motor bearing is destroyed. Severe melting means structural integrity is compromised.
In these cases, replace the unit. Safety matters more than saving money.
Prevent Future Failures with Maintenance
Extend your hair dryer life by doubling your care routine.
Monthly Tasks
Clean the air intake filter. Inspect the cord for fraying or damage.
Quarterly Tasks
Remove the fan housing. Clean the blades and shaft. Check for loose wires inside.
Annual Tasks
Test all switches. Re-tighten connections. Consider professional servicing for heavy-use dryers.
Best practices include letting the dryer cool before storing, not wrapping the cord tightly around the handle, and storing in a dry location.
Repair vs. Replace: Make the Right Call
Not every dryer deserves fixing. Make the smart decision based on the situation.
Repair If
A single component failed, such as a fuse, switch, or cord. The dryer has high sentimental or professional value. The DIY cost is under thirty dollars.
Replace If
Multiple failures exist, such as fuse plus motor plus wiring. The repair cost exceeds fifty percent of a new dryer price. The design is glued or non-serviceable, common in T3 or Dyson models.
DIY repairs save sixty to ninety percent compared to professional repair, which costs one hundred to three hundred dollars.
Frequently Asked Questions About Hair Dryer Repair
Why does my hair dryer shut off after thirty seconds?
This typically happens because the air intake is clogged with lint, causing the dryer to overheat. The thermal fuse trips as a safety measure. Clean the filter thoroughly and test again.
Can I replace the thermal fuse with a higher temperature rating?
No. Always replace the thermal fuse with the exact same temperature rating. Using a higher rating removes fire protection and creates a safety hazard.
My hair dryer has no heat but the fan works. What is wrong?
The heating element has likely failed. Test it with a multimeter set to resistance mode. Infinite resistance means the element is open and needs replacement.
How do I know if the motor is bad?
If the dryer hums but the fan does not spin, the motor may be seized or have failed. Try manually rotating the fan blades. If they move freely, test the motor with a multimeter for continuity. OL indicates a dead motor.
Is it worth repairing a cheap hair dryer?
Most budget hair dryers cost less than thirty dollars new. If the repair requires multiple expensive parts, replacement is usually more practical. However, sentimental or professional-grade dryers are worth the repair effort.
Can I use my hair dryer in another country with different voltage?
Only if the dryer is dual-voltage. Using a 110V dryer in a 230V country will fry the internal components. Check the voltage label on the dryer before traveling.
Key Takeaways for Repairing Your Hair Dryer
Repairing a hair dryer is a practical skill that saves money and keeps a useful tool in service. Start with simple fixes like cleaning the filter and checking the GFCI plug before moving to more complex repairs. Use a multimeter to test components systematically and confirm faults before replacing parts. Never bypass safety devices like thermal fuses, as they exist to prevent fires.
Document everything during disassembly with photos. This makes reassembly much easier. For sentimental dryers, consider swapping internals from a donor model to preserve the exterior while restoring function.
The effort you put into repairing something special carries meaning beyond mere functionality. The care and persistence you demonstrate matter, whether you are restoring a beloved gift or extending the life of a professional tool. With the right steps, you can bring your hair dryer back to life safely and effectively.