

If you’ve ever struggled to define your waves or curls without heat damage, the Dyson Supersonic hair dryer offers a smarter way to curl hair using precision airflow and intelligent heat control. Unlike flat irons or curling wands that rely on extreme heat, this high-performance dryer shapes and sets curls through controlled drying, preserving moisture, reducing frizz, and enhancing natural texture. Whether you have loose waves or tight coils, mastering how to curl hair with a Dyson blow dryer unlocks bouncy, long-lasting definition without compromise. In this guide, you’ll learn the exact attachments, settings, and techniques used by stylists to achieve salon-quality curls at home.
Choose the Right Dyson Attachment for Curling
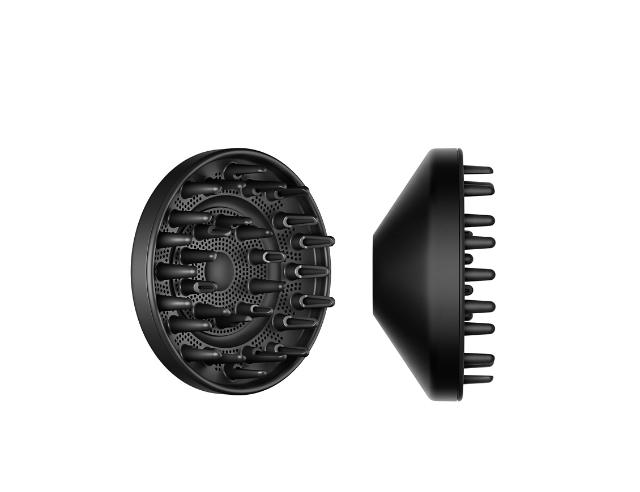
The key to curl definition starts with using the correct magnetic attachment. Not all nozzles work for curling, and using the wrong one can flatten your results. The Dyson Diffuser is engineered specifically to enhance natural curls and waves. Its re-engineered prongs cradle sections of hair, allowing air to circulate evenly without disturbing the curl pattern. By lifting roots gently and drying from the inside out, it boosts volume and minimizes frizz.
Why the Diffuser Outperforms Other Attachments
The Diffuser delivers superior results because it was designed with curl enhancement in mind. Here is what makes it different from other attachments.
The magnetic fit snaps on securely and rotates 360 degrees for full scalp access. The prong design features longer, flexible prongs that allow you to tuck curls deep into the diffuser for root lift. This attachment works best for Type 2 wavy to Type 4 coily textures, and it is especially effective on Type 2C and 3A curls.
Pro Tip: Avoid using the Smoothing or Styling concentrators for curling because they focus airflow too narrowly and can flatten your curls.
Prepare Your Hair Before Drying
Great curls start before the dryer even turns on. Proper prep ensures maximum definition, hold, and shine. Using the right products and techniques before drying sets the foundation for long-lasting results.
Apply Curl-Enhancing Products
Use a mousse, curl cream, or light gel to define and protect damp hair. These products lock in shape during drying and prevent puffiness.
Here is how to apply curl-enhancing products correctly.
Start with clean, towel-dried hair and use a microfiber towel to reduce frizz. Dispense a golf-ball-sized amount of product into your palms. Rake the product through each section from mid-lengths to ends. Scrunch upward toward the scalp to encourage curl formation. Repeat scrunching as you go because this activates curl clumps and reduces frizz.
Avoid rubbing or combing hair vigorously because this breaks up curl patterns and causes flyaways.
Section Hair for Even Drying
Divide hair into 4 to 6 sections using clips. This ensures every strand gets even airflow and prevents missed spots. Clip top layers up and start with the bottom sections. Work in small subsections if you want tighter definition, especially for Type 3 and 4 curls.
Set Optimal Heat and Airflow Settings
Using the right settings protects your hair while setting curls effectively. Too much heat damages cuticles, and too much airflow disrupts curl formation. The Dyson Supersonic measures air temperature over 40 times per second to prevent extreme heat exposure, protecting hair’s natural shine and structure.
Recommended Settings by Hair Type
| Setting | Recommendation | Why It Matters |
|---|---|---|
| Heat Level | Medium, or Low for fine or fragile hair | Prevents overheating while still setting curls |
| Airflow Speed | Medium to Low | Gentle diffusion preserves curl shape |
| Cold Shot | At the end for 10 to 15 seconds | Locks in style and seals cuticle |
Why Low Airflow Works Better for Curls
While some sources recommend medium airflow, low airflow is ideal for tighter curl types like 2C and 3A. High speed can scatter curls and create puffiness. Lower speed allows for more controlled drying and better clumping. The Dyson high-velocity motor spins at 110,000 rpm, which means even low airflow is powerful but more precise.
Expert Note: The cold shot delivers air at approximately 82.4 degrees Fahrenheit, which seals the hair cuticle and sets the style without thermal shock.
Dry Hair in Sections with the Diffuser
Now comes the core technique: drying each section to enhance curl formation. This step-by-step process ensures even drying and maximum curl definition.
Flip Head Upside Down for Volume
Start by flipping your head forward or upside down. Focus on drying the crown and top layers first. Place a section of hair into the diffuser prongs. Gently lift toward the scalp to encourage root lift and body. Hold the diffuser close but do not press hard because let the airflow do the work.
Visual Cue: Hair should puff slightly and feel warmer within 30 seconds. If not, check the filter or attachment fit.
Dry Sides and Back While Upright
Return to standing position and tilt head sideways to access side sections. Repeat the same method: insert hair into prongs, lift roots, and use low-to-medium airflow. Keep the dryer moving slowly to avoid concentrating heat in one spot. Dry each section until just dry to the touch because over-drying increases frizz.
Time Estimate: Full head takes 15 to 25 minutes depending on thickness.
Define Curls with Finger Coiling
For salon-level definition, use this pro technique to shape individual curls. This method is time-intensive but delivers tight, bouncy ringlets with zero clamp marks or heat damage.
How to Finger Coil Damp Hair
Take a small section of damp hair about 1 inch wide. Wrap it around your finger to form a spiral. Clip the curl in place with a duckbill or micro-clip. Hover the diffuser over the pinned curl until fully dry. This technique works best for Type 3 and 4 curls needing maximum definition.
Lock In Style with Cold Air and Serum
Finish your style with two final steps that boost shine and ensure long-lasting curl definition.
Activate Cold Shot to Set Curls
Once hair is completely dry, press the cold shot button. Sweep the diffuser over your entire head for 10 to 15 seconds. Cold air seals the cuticle, locking in shape and reducing frizz.
Result: Curls stay bouncy and defined for 24 to 48 hours.
Apply Anti-Frizz Serum for Shine
Optional but effective: apply a pea-sized amount of lightweight serum or oil. Rub between palms and gently glaze over the surface of curls. Avoid scrunching or touching too much because this can disrupt definition.
Warning: Too much product weighs down curls. Less is more.
Avoid Common Curling Mistakes
Even with the right tools, small errors can ruin curl definition. Here is what to watch out for and how to correct it.
Mistakes That Ruin Curl Definition
Rubbing hair with a regular towel causes frizz and cuticle damage. Use a microfiber towel or cotton T-shirt instead. Using high heat on fine or fragile hair leads to dryness and breakage. Stick to low or medium heat. Over-drying curls triggers frizz and puffiness. Stop when hair feels just dry. Skipping sectioning causes uneven drying and flat roots. Always clip and work in parts. Ignoring filter maintenance reduces airflow and efficiency. Clean monthly or when white LEDs flash.
Smooth Flyaways Without Disturbing Curls
After curling, tame loose strands for a polished finish using the Flyaway attachment. This tool uses aerodynamic Coanda effect to pull loose hairs into place.
When to Use the Flyaway Attachment
Use the Flyaway attachment on high airflow and cold setting. Hold near roots and slowly glide down the hair shaft. This is perfect for smoothing baby hairs and creating sleek edges. Do not use this attachment during drying because it is only for final touch-ups.
Maintain Your Dyson for Best Results
A clean, well-maintained dryer performs better and lasts longer. Regular maintenance ensures consistent performance for curling.
Clean the Filter Monthly
Remove the filter ring at the base of the handle. Rinse under warm water until clear. Let dry completely, at least 4 hours, before reinserting.
Sign of Clog: Slower drying, weak airflow, and flashing white LEDs indicate it is time to clean the filter.
Care for Attachments
Wipe the diffuser and Flyaway nozzle with a damp cloth. Never submerge in water. Store in a dry place and use the stand to prevent cord tangles. Dyson offers a 2-year limited warranty on motor and electronics.
Customize Your Technique by Hair Type
Tailor your approach based on your curl pattern for the best results. Different hair types require different settings and techniques.
Hair Type-Specific Recommendations
For Type 2A to 2B loose waves, use low heat and medium airflow. Scrunch lightly during drying for textured, beachy waves. For Type 2C defined waves and curls, apply curl cream, rake and scrunch, and use medium heat with low airflow. Finger-coil stubborn sections for definition. For Type 3 spiral curls, deep-diffuse at roots for volume. Pin curls to dry for maximum spring. Use leave-in conditioner plus gel for hold. For Type 4 coily and kinky hair, focus on root lifting with the diffuser. Use thicker leave-in products and gels. Dry in small sections to prevent shrinkage.
Speed Up Drying Time with Smart Technique
The Dyson dries up to 50 percent faster than traditional dryers, but only if used correctly. These tips maximize efficiency.
Tips for Faster Drying
Start with well-squeezed, damp hair, not dripping wet. Use medium heat initially, then lower as hair dries. Keep the diffuser moving and do not hold in one spot. Combine with a heat-protectant spray if using higher settings.
User Insight: Verified owners report 30 to 50 percent less drying time with consistent airflow and intelligent heat control.
Frequently Asked Questions About Curling Hair with Dyson Blow Dryer
Can I curl hair without the diffuser attachment?
No, the diffuser is essential for curling. Other attachments like the Smoothing concentrator focus airflow too narrowly and will flatten curls. The diffuser’s prongs cradle hair and allow even airflow circulation.
What heat setting is safest for curly hair?
Medium heat is safest for most curl types. Use low heat if you have fine or fragile hair. The Dyson’s intelligent heat control measures temperature 40 times per second to prevent damage.
How long do Dyson curls last?
Curls set with the cold shot last 24 to 48 hours with minimal droop, especially when paired with curl-enhancing products. The cold air locks in the style and seals the cuticle.
Why are my curls frizzy after diffusing?
Frizz usually comes from over-drying, using high heat, or skipping sectioning. Stop diffusing when hair feels just dry to the touch. Use low airflow and always section hair before drying.
Can I use the Dyson on wet hair to curl it?
Start with towel-dried hair that is damp but not dripping wet. Excess water dilutes styling products and extends drying time. Squeeze out water with a microfiber towel first.
How often should I clean my Dyson filter?
Clean the filter monthly or when the three white LEDs flash continuously. A clogged filter reduces airflow efficiency and impacts curl definition and drying time.
Key Takeaways for Curling Hair with Dyson Blow Dryer
Curling hair with a Dyson blow dryer is not about extreme heat. It is about smart airflow, proper prep, and precision technique. By using the Diffuser attachment, applying the right curl-enhancing products, setting medium heat with low-to-medium airflow, and finishing with a cold shot, you can achieve frizz-free, bouncy curls that last. The key steps are sectioning hair evenly, using the finger-coiling technique for advanced definition, and locking in style with cold air. With regular filter maintenance and a few pro tricks, your Dyson becomes the ultimate curl-defining tool without any hot tools required. Whether you are enhancing natural waves or defining tight coils, this method protects hair health while delivering salon-quality results at home.



