

You turn on your Dyson Supersonic, expecting that perfect stream of warm air—but instead, only cold air blows. The fan spins. The lights respond. But no heat comes out. You’re not alone. Thousands of Dyson hair dryer owners face this exact issue, especially with models like the HD01 and HD08 after 2–3 years of use. The problem? Most often, a blown thermal fuse caused by restricted airflow—a silent killer hiding in plain sight. In this guide, you’ll learn how to diagnose and fix your Dyson hair dryer not heating, from quick resets to advanced cleaning and repair options. Whether it’s a simple clog or a deeper electrical failure, we’ll walk through every step to get your dryer back in action.
Quick Fixes for Dyson Hair Dryer Not Heating
Press the Cold Air Button Firmly
If your Dyson blows only cold air, the cold air button may be stuck. Even a slight mechanical jam can override heat settings and force cool mode. This tiny button on the back of the handle controls a switch that cuts power to the heating element. Over time, hairspray residue or debris can gum it up.
How to fix it:
• Press and release the cold air button 10–15 times firmly
• Listen for a faint click—this indicates the switch is moving
• Try switching heat settings afterward
Success sign: The red heat indicator lights up, and warm air returns.
Pro Tip: Some users fixed the issue just by loosening a small retaining screw behind the button—do this only if comfortable with minor disassembly.
Tap the Heat Level Button Repeatedly
If the heat settings don’t respond or the light flickers weakly, the tactile button may be failing. Even if the fan runs, a broken connection here means no signal reaches the heating circuit.
Action steps:
• Tap the heat button 20 times quickly
• Cycle through low, medium, and high settings
• Watch for consistent light changes
If it fails: The internal switch or circuit board may need testing—move to deeper diagnostics.
Clean the Air Filter to Restore Heat
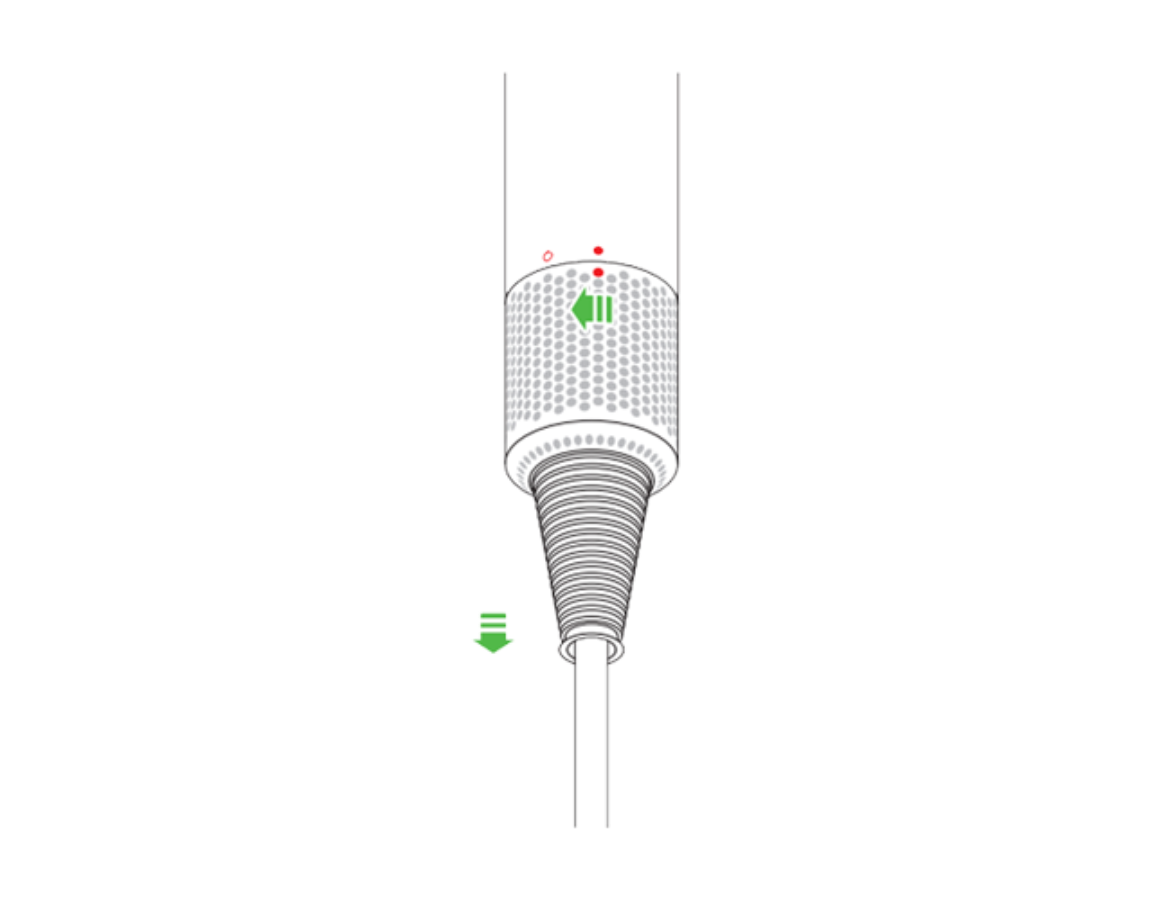
Remove and Brush the Filter Cage
A clogged air filter is the #1 cause of Dyson hair dryer overheating and no-heat failure. The filter, located at the base of the handle, traps lint, hair, and dust. Even a thin layer of invisible buildup can restrict airflow enough to trigger the thermal fuse.
Cleaning steps:
1. Unplug the dryer
2. Twist the outer filter cage counterclockwise and pull down
3. Remove the fine metal mesh filter inside
4. Use the included brush or a clean toothbrush to scrub both parts
5. Blow out debris with compressed air if needed
6. Reinstall by sliding up and twisting until it clicks
Frequency: Clean every 2–4 weeks with regular use.
Warning: Never wash the filter with water unless your model explicitly allows it. Moisture can damage internal electronics.
Why Filter Cleaning Matters
Restricted airflow causes the motor and heating chamber to overheat rapidly. The thermal fuse—a one-time safety device—blows to prevent fire. Once blown, it cannot reset and must be replaced. But if caught early, cleaning may prevent permanent damage.
Visual cue: If the mesh looks dark gray or feels gritty, it’s overdue for cleaning.
Reset the Device After Overheating
Unplug and Wait 15–60 Minutes
If your Dyson felt unusually hot before failing, it may have entered thermal protection mode. Unlike a blown fuse, this is a temporary shutdown. The system needs time to cool before restarting.
Cool-down protocol:
• Unplug immediately
• Let it sit undisturbed for 15 minutes (minimum)
• For units that ran for extended periods: wait 30–60 minutes
• Do not force restart—this can trigger permanent fuse failure
After cooling: Plug back in and test heat settings.
Note: If the dryer works again briefly but fails again under heat, the thermal fuse may already be compromised.
Reset the ALCI Plug
The ALCI (Appliance Leakage Circuit Interrupter) plug is a safety feature that cuts power during electrical faults or overheating. It can trip even if the outlet is fine.
How to reset:
• Unplug from the wall
• Press the “RESET” button on the plug firmly until it clicks
• Plug into a known-working outlet (test with another device first)
• Power on the dryer
If it trips again immediately: There’s likely an internal fault—do not continue use.
Advanced Cleaning Inside the Barrel
Blow Out Lint with Compressed Air
Even with a clean filter, lint can accumulate inside the barrel near the heating element and bimetal strip. This hidden debris blocks airflow and insulates heat sensors, leading to false thermal shutdowns.
Procedure:
• Use a can of compressed air or handheld blower
• Aim into the air intake at the base and the barrel nozzle
• Blow in short bursts for 30 seconds each direction
• Gently tap the barrel to dislodge stubborn particles
User success: Multiple reports confirm heat restored after internal blowing—no disassembly needed.
Alternative: If no compressed air, use a hair dryer on cool setting to blow air into the intake—reverse airflow can clear blockages.
Clean the Thermal Cutout Switch
The bimetal strip and thermal switch are safety components near the heating element. If coated in lint, they can’t regulate temperature properly.
Advanced method (partial disassembly):
1. Remove screws from the handle (requires Torx T9 or T10)
2. Carefully separate the casing
3. Locate the white or silver thermal switch in the barrel
4. Use a toothpick or pin to gently lift the bimetal strip
5. Blow out debris with compressed air
6. Reassemble and test
Risk: This voids any remaining warranty and risks damaging wires. Only attempt if experienced.
Diagnose Internal Electrical Failures

Test the Thermal Fuse with a Multimeter
The thermal fuse is a small, non-resettable device that breaks the circuit when overheated. Once blown, it stops all heating permanently.
How to test:
1. Disassemble the dryer to access the barrel
2. Locate the thermal fuse (usually a white or black cylindrical component in-line with heating wires)
3. Set multimeter to continuity mode
4. Touch probes to both ends of the fuse
5. No beep = blown fuse
Outcome: If blown, replacement is required. No workaround.
Note: Dyson does not sell thermal fuses separately. Replacement requires sourcing from electronics suppliers or third-party repair.
Check the Heating Element Continuity
Even if power reaches the circuit, the heating coil may be open due to age or overload.
Testing steps:
• Disconnect power and disassemble
• Locate the heating element terminals (ceramic housing with metal coils)
• Test for continuity across the two leads
• No continuity = failed element
Reality: Replacement involves soldering and precise reassembly—best left to professionals.
Professional Repair Options for Your Dyson
Contact Dyson Support
Even if out of warranty, Dyson may still help. Many users report successful repairs or discounted service beyond the 2-year mark.
What to prepare:
• Serial number (on cord label or device body)
• Purchase date or receipt (if available)
• List of troubleshooting steps tried
Support options:
• Mail-in repair service with diagnostic quote
• Possible replacement unit at reduced cost
• Recycling program for old units
Pro Tip: Be polite but persistent. Mention if the unit failed just after warranty—some reps offer goodwill repairs.
Third-Party Repair Shops
While Dyson discourages user repairs, some electronics technicians can fix:
• Blown thermal fuses
• Failed heating elements
• Button and circuit issues
Find a qualified shop:
• Search for “small appliance electronics repair” or “circuit board repair” near you
• Ask if they’ve worked on Dyson hair dryers before
• Confirm if they can source replacement parts
Cost range: $100–$200—significantly less than a new $400 dryer.
Caution: Avoid shops that lack experience with high-speed motors or sealed devices.
Warranty Coverage and Replacement Decisions
Is Your Dyson Still Under Warranty?
Dyson offers a 2-year limited warranty covering defects in materials and workmanship.
What’s covered:
• Thermal fuse failure (if not due to neglect)
• Heating element defects
• Manufacturing flaws
What’s not covered:
• Damage from dirty filters or lack of maintenance
• Water exposure or unauthorized repairs
If under warranty: Contact Dyson immediately—repair or replacement is free.
Out-of-Warranty? Repair or Replace
Many users face failure at 2.5 to 3 years—just past warranty. The choice: repair or replace?
| Option | Cost | Pros | Cons |
|---|---|---|---|
| Repair | $100–$200 | Saves 50% vs new | Limited repair shops |
| Replace | $300–$400 | New warranty, latest features | Expensive, e-waste |
Rule of thumb: If repair costs more than 50% of a new unit, replace.
User sentiment: Many feel Dyson’s 2-year warranty is too short for a premium device. Regular maintenance is key to longevity.
Prevent Future Heating Failures
Clean the Filter Every Few Weeks
This is the single most effective prevention step. A clean filter ensures proper airflow, preventing overheating.
Best practices:
• Clean every 2–4 weeks
• Use dry brushing only unless model allows washing
• Store in a dry, low-dust area
Avoid Continuous Use Without Breaks
Using the dryer for long styling sessions without pause increases heat buildup.
Guideline:
• Use in 10–15 minute intervals
• Let it cool for 5 minutes between uses
Watch for Early Warning Signs
Don’t wait for total failure. Look for:
• Handle or barrel feels hotter than usual
• Intermittent heat loss during use
• Longer drying times despite strong airflow
These signal early overheating—clean the filter immediately.
Frequently Asked Questions About Dyson Hair Dryer Not Heating
Why does my Dyson hair dryer suddenly only blow cold air?
The most common cause is a blown thermal fuse due to restricted airflow. When the air filter becomes clogged, the heating element overheats, triggering the safety fuse to blow. This cuts heat while allowing the fan to continue running.
Can I fix a Dyson hair dryer that won’t heat myself?
Yes, you can try several fixes at home. Start by cleaning the air filter, pressing the cold air button firmly, and resetting the ALCI plug. If these don’t work, the thermal fuse may be blown, requiring professional repair or replacement.
How much does it cost to repair a Dyson hair dryer not heating?
Professional repairs typically cost $100–$200 for thermal fuse or heating element replacement. A new Dyson Supersonic costs $300–$400. If repair exceeds 50% of replacement cost, buying new is often smarter.
How do I know if my thermal fuse is blown?
Use a multimeter in continuity mode to test the thermal fuse (located in the barrel near the heating element). Place probes on both ends—if there’s no beep, the fuse is blown and must be replaced.
Is the Dyson hair dryer warranty long enough?
Dyson offers a 2-year warranty, but many failures occur at 2.5–3 years—just after warranty expires. Regular filter cleaning is essential to prevent premature thermal fuse failure and extend your dryer’s lifespan.
Can a dirty filter really cause my Dyson to stop heating?
Absolutely. A clogged filter restricts airflow, causing the heating element to overheat. This triggers the thermal fuse to blow as a safety measure. Cleaning the filter every 2–4 weeks is the single most important maintenance step.
Final Thoughts on Fixing Your Dyson Hair Dryer Not Heating
The most common cause of Dyson hair dryer not heating is a blown thermal fuse due to restricted airflow from a dirty filter. While the fan keeps spinning, the safety system cuts heat to prevent fire. In many cases, simple cleaning or a cold air button reset fixes the issue. But once the fuse blows, professional repair or replacement is needed.
Bottom line:
• Try filter cleaning, button resets, and cooling first
• Use compressed air or multimeter testing if comfortable
• Contact Dyson or a repair shop for internal failures
• Clean the filter every few weeks to prevent recurrence
With proper care, your Dyson Supersonic can last well beyond the warranty—saving you time, money, and frustration.


