
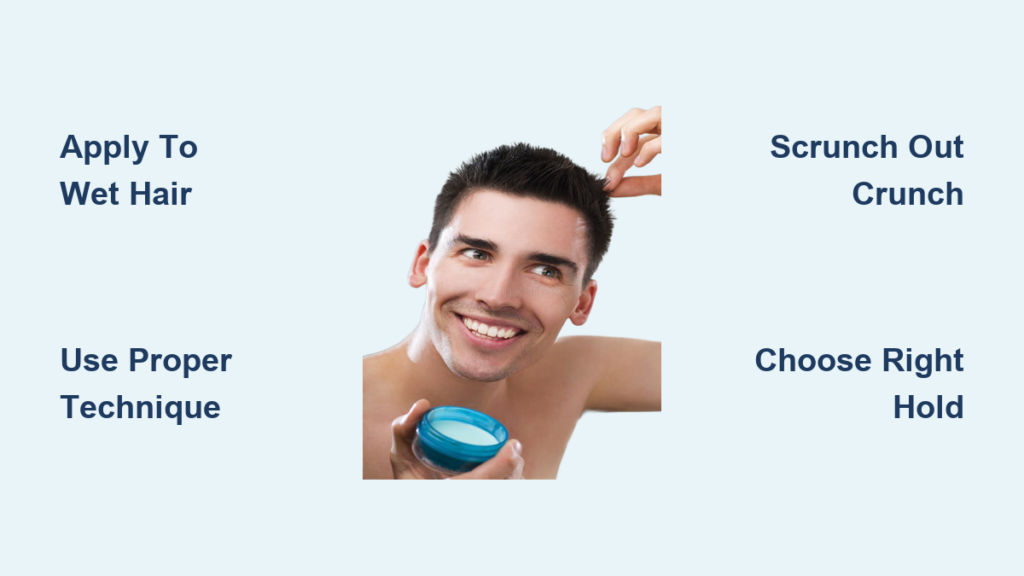
If you have curly hair, you know the struggle. Frizz takes over, definition disappears by midday, and styles that looked amazing this morning fall flat by noon. The secret to bouncy, defined curls that actually last is knowing how to use hair gel for curly hair the right way. But here is the thing: most people give up on gel after one bad experience with crunchiness or flaking, never realizing they were missing a key step or two.
This guide covers everything from choosing the right gel for your specific curl type to applying it correctly, drying without frizz, and mastering the scrunch-out-the- crunch technique for soft, touchable curls. Whether you have loose 2A waves or tight 4C coils, these step-by-step methods will transform your routine.
Choose the Right Gel for Your Curl Type
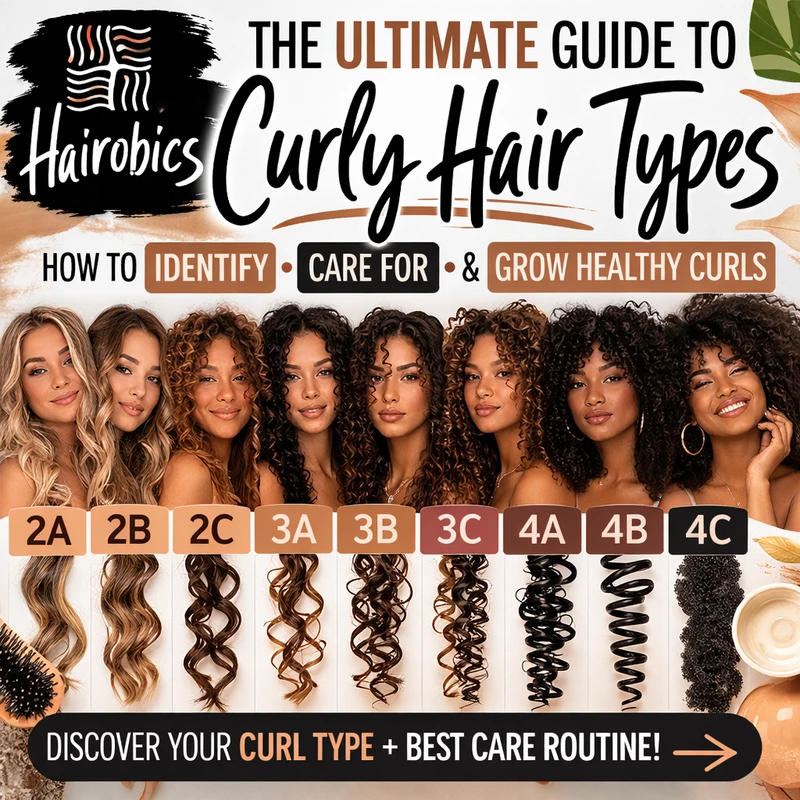
Not all gels work for curly hair. The wrong formula leaves your strands dry, flaky, or weighed down. Picking the right gel starts with understanding your curl type and what your hair actually needs.
Match Gel Hold to Your Curl Pattern
Soft to medium hold gels work best for wavy hair (types 2A through 2C). These formulas add definition without crushing your natural wave pattern. Medium to hard hold is ideal for curly hair (types 3A through 3C) where you need more control over volume and frizz. Hard hold gels are essential for coily and kinky hair (types 4A through 4C) because these curl patterns need maximum locking power to withstand shrinkage and humidity.
Fine or low-density curls need lightweight formulas to avoid looking flat. Thicker, coarser curls can handle stronger-hold gels that will not budge throughout the day.
Avoid These Drying and Damaging Ingredients
Steer clear of gels containing drying alcohols like ethanol or alcohol denat. These strip moisture from your strands and cause brittleness over time. Silicones such as dimethicone create buildup that weighs down curls and blocks hydration. Sulfates, parabens, and synthetic fragrances can also irritate your scalp and damage your curl pattern.
Look for Curly Girl Approved Ingredients
Choose gels with hydrating ingredients like aloe vera, which soothes the scalp and enhances slip. Plant-based glycerin draws moisture into your hair, though it works best in humid climates. Hyaluronic acid plumps curls and retains hydration. Natural polymers from flaxseed or agar agar provide flexible, flake-free hold. Some gels also include SymHair Thermo, which protects against humidity and heat damage.
Wash and Condition Before Applying Gel
Gel does not hydrate your hair. It seals in moisture that is already there. This means your wash routine creates the foundation for gel success.
Cleanse Without Stripping Natural Oils
Use a sulfate-free shampoo or co-wash to gently cleanse your scalp without removing essential moisture. Focus on your scalp and let the suds run through to the ends. Over-washing strips your natural oils, so limit cleansing to once or twice per week.
Deep Condition and Seal the Cuticle
Apply conditioner from mid-lengths to your ends, focusing on the most fragile areas. Use the squish-to-condish method: squeeze the conditioner upward through your curls to encourage clumping. Rinse with cool water to seal the cuticle and boost shine.
Key Rule: Your hair must be soaking wet before gel goes on. This prevents frizz and ensures even distribution across all your curls.
Remove Excess Water Without Causing Frizz
Wet hair is fragile. Rough drying disrupts curl clumps and creates puffiness instead of definition.
Use a Microfiber Towel or Cotton T-Shirt
Gently scrunch your hair upward with a microfiber towel or cotton t-shirt. Never rub or twist your hair, as this creates friction and frizz.
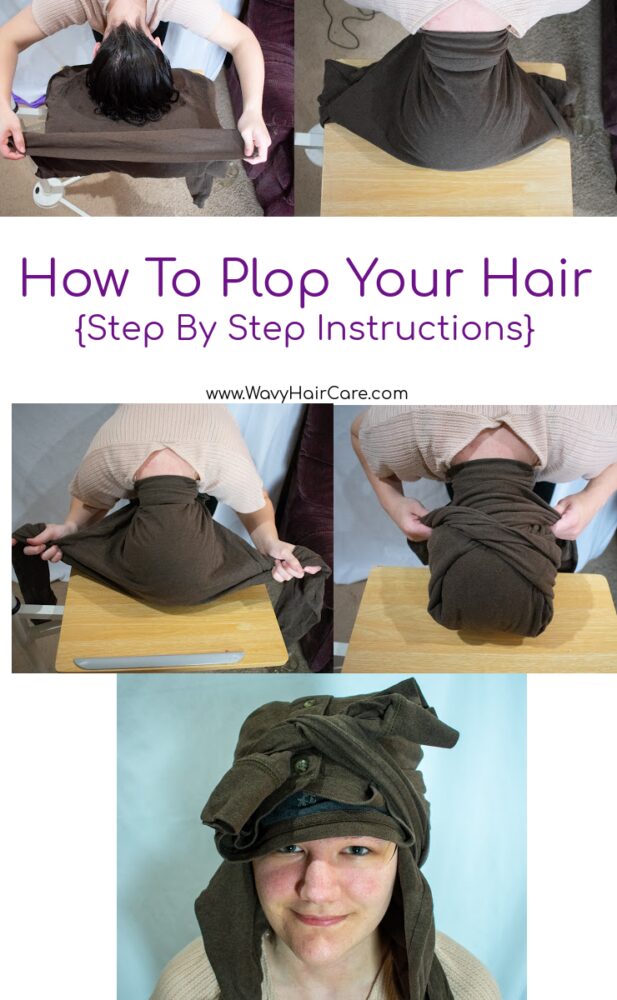
Try Plopping for Better Definition
Lay a microfiber towel or t-shirt flat, flip your hair forward, and place it in the center of the fabric. Wrap the fabric around your hair and secure it at the nape of your neck. Leave this for five to ten minutes. Plopping works especially well for thick, coarse, or high-porosity hair because it removes water while preserving your curl formation.
Apply Gel the Right Way
Gel goes on last, after your leave-in conditioner and curl cream. This layering system is called the L.C.G. method: Leave-in, Cream, Gel.
Use the Correct Amount for Your Hair Length
For short hair, start with a dime-sized amount. Shoulder-length hair typically needs a quarter-sized dollop. Long or thick hair may need up to a half-dollar size. If you have fine curls, use less product to avoid flattening your hair. Dense, coily hair may need multiple applications for full coverage.
Warning: Too much gel causes stiffness and flaking. Start small and add more only if needed.
Application Techniques That Actually Work
The praying hands method works best for types 3A through 3C. Rub gel between your palms, then glide your flat hands down each section from root to tip. This smooths the cuticle and reduces frizz while enhancing shine.
Scrunching is a universal technique that works for all curl types. Apply gel to your ends first, then scrunch upward toward your scalp. Continue until you hear a squishy sound, which indicates the water and gel are mixing properly. If you do not hear this sound, spritz some water and scrunch again.
For type 4 hair, use the rake-and-shake method. Gently detangle and distribute gel using your fingers, then follow with scrunching to reform your curls.
Shingling delivers maximum definition for types 4A through 4C. Section your hair and apply gel to one small section at a time, smoothing each strand like roof shingles. This technique ensures even coverage and dramatically reduces shrinkage.
Tame Edges and Baby Hairs
Apply a small amount of gel to dry or slightly damp hair around your hairline. Use your fingertips or a fine-tooth comb to smooth these areas. Avoid over-saturating, as this causes flaking or traction stress on delicate edges.
Dry Your Curls Without Disturbing the Set
How you dry your hair determines your final look. Touching wet curls creates frizz, so let them set undisturbed.
Air Dry for Best Definition
Let your hair dry completely without touching, brushing, or pulling it. This takes three to six hours depending on your hair thickness. Air drying works best for wash-and-go styles where definition is your priority.
Diffuse for Volume and Speed
Use a diffuser attachment on your blow dryer set to low heat and low speed. Cup your curls gently in the diffuser bowl without moving them around. Flip your head upside down for root lift and volume. You can spray a curl-defense mist before diffusing for extra protection.
Pro Tip: Reapply a small amount of gel after towel drying to boost the cast and replace product absorbed by your towel.
Scrunch Out the Crunch the Right Way
That crispy, crunchy feeling is not a mistake. It is protection. The gel cast shields your curls as they dry. Once fully dry, it is time to break that cast for soft, bouncy curls.
Wait Until Hair Is Completely Dry
Scrunching too early releases the gel cast before your curls have set, creating frizz. Test by ensuring no dampness remains at your scalp or ends.
The Breaking Cast Technique
Use clean hands to scrunch from mid-lengths to ends. Feel the crunch soften as your curls spring back. For extra softness, scrunch with a microfiber cloth or cotton t-shirt. Warm air from a diffuser on low heat also helps soften the cast. Add one to two drops of oil (argan or jojoba work well) to your palms and scrunch in for added shine.
Add Volume at the Roots
Flip your hair over, insert your fingers at the scalp, and gently shake and lift the roots. This breaks any residual cast at the root and adds volume to your style.
Troubleshoot Common Gel Problems
Even experienced curly hair enthusiasts run into issues. Here is how to fix them fast.
White Flakes
Cause: Product incompatibility, such as your cream and gel repelling each other. Fix: Test your product combination in your palm. If the mixture beads up or rolls into balls, the products are incompatible. Switch to water-based, Curly Girl Method-compliant products only.
Hair Feels Too Stiff or Sticky
Cause: Over-application or a poor-quality gel formula. Fix: Use less gel. Dilute the product with water in your palms before applying. Try a lighter-hold gel.
Frizzy Ends
Cause: Your ends were not sealed with gel. Fix: Apply gel to your ends first and ensure full saturation before drying.
Curls Fall Flat
Cause: Hair was not wet enough, you used too little gel, or your gel hold is too weak. Fix: Apply gel to soaking-wet hair. Use enough product to coat all strands. Upgrade to a stronger-hold gel or layer mousse underneath.
Product Buildup Over Time
Cause: Silicones, mineral oil, or infrequent cleansing. Fix: Clarify every three to four weeks with a sulfate-free shampoo or a one-to-four ratio apple cider vinegar rinse.
Customize Your Routine by Curl Type
One approach does not work for everyone. Tailor your technique to your specific curl pattern.
Wavy Hair (2A to 2C)
Use low-to-medium hold gel to avoid flattening your natural waves. Apply less product than you think you need. Air dry or use light diffusing for a beachy, natural finish.
Curly Hair (3A to 3C)
Use medium-to-hard hold gel for best definition. Apply with praying hands followed by scrunching. Break the cast fully for bouncy, touchable curls. This curl type works perfectly for wash-and-go styles.
Coily and Kinky Hair (4A to 4C)
Use hard hold gel that can withstand shrinkage. Layer with oil or butter for extra moisture. Try shingling or rake-and-shake for even coverage. Consider twist-out styles instead of gel-only looks. Pre-poo weekly to combat dryness.
Maintain Your Style Between Washes
Great curls can last three to five days with proper care.
Protect Your Curls at Night
Sleep on a satin or silk pillowcase to reduce friction. Use a silk bonnet or scarf to lock in moisture and prevent snagging. Try the pineapple method: loosely gather your hair in a high ponytail on top of your head to preserve volume.
Refresh Your Curls on Non-Wash Days
Spritz your hair with water mixed with leave-in conditioner. Lightly re-scrunch to revive definition. If needed, add one drop of gel to your fingertips and smooth over any frizzy areas.
Adjust for Climate and Humidity
Weather affects how your gel performs.
High Humidity (70% to 80%)
Use gels with humidity-resistant polymers like SymHair Thermo, flaxseed, or aloe vera. Hard-hold gels perform best in humid conditions.
Dry Climate
Avoid glycerin-heavy gels, as they can pull moisture out of your hair in dry air. Opt for gels with sealed-in hydration from natural oils instead.
Cold Weather
Combat static with a silk bonnet. Use hydrating gel formulas that contain natural oils to prevent brittleness.
Recommended Gel Products by Hold Level
Hard Hold Gels
EcoSlay provides flexible hold without flaking. Uncle Funkys Daughter offers legendary hold and is Curly Girl Method-approved. Curlsmith Ultra Defining Gel delivers high shine with humidity resistance. Curl Crush Defining Gel provides long-lasting, buildable definition.
Medium Hold Gels
Cantu Lemon and Sage is affordable and lightweight. Maui Moisture Curl Quencher adds hydration with a tropical scent. Kinky-Curly Curling Custard uses natural flaxseed for soft definition.
Low Hold Gels
Herbal Essences Curl Boost is budget-friendly with light shine. Giovanni Defining Gel is vegan and alcohol-free. Schwarzkopf Taft Mega Styling Gel comes highly recommended in curly hair communities for being alcohol-free with high hold and no flaking.
The Complete 7-Step Gel Routine
- Wash and condition using sulfate-free shampoo or co-wash. Rinse with cool water.
- Plop or towel dry for five to ten minutes with a microfiber towel or cotton t-shirt.
- Layer products by applying leave-in conditioner, then curl cream if desired.
- Apply gel to soaking-wet hair using praying hands, scrunching, or shingling.
- Dry your hair by air drying or diffusing on low heat. Do not touch while drying.
- Scrunch out the crunch only when your hair is completely dry. Add oil for shine.
- Maintain your style by pineappling at night and refreshing with water and leave-in.
Key Takeaways for Using Hair Gel on Curly Hair
Finding the right gel for your curl type is the foundation of success. Always apply gel to soaking-wet hair, using the L.C.G. layering method for best results. The scrunch-out-the- crunch step transforms stiff, crunchy curls into soft, defined styles, so never skip it. Experiment with product amounts until you find your perfect balance, and customize your technique based on your specific curl pattern and climate conditions.
Frequently Asked Questions About Using Hair Gel for Curly Hair
Does hair gel work on all curl types?
Yes, but the hold strength matters. Wavy hair needs low to medium hold, while curly hair needs medium to hard hold. Coily and kinky hair requires hard hold gels for lasting definition.
Why does my gel leave white flakes?
White flakes usually come from product incompatibility. If your cream and gel repel each other, they will flake. Switch to water-based, Curly Girl Method-compliant products to fix this.
How do I get soft curls after using gel?
Wait until your hair is completely dry, then scrunch the gel cast with clean hands. Adding one to two drops of oil to your palms before scrunching creates softer, shinier curls.
Can I use gel on dry hair for touch-ups?
Yes. Apply a very small amount to your fingertips and smooth over frizzy areas. Avoid over-saturating, as this causes flaking.
How often should I clarify my hair when using gel?
Clarify every three to four weeks to prevent buildup from styling products. Use a sulfate-free shampoo or an apple cider vinegar rinse to remove residue.



