

You’ve seen the bouncy blowouts, the voluminous waves, and the salon-perfect curls that look like they took hours to achieve. The secret is hair rollers and a hair dryer—a classic combo that still delivers modern, wearable results. Whether you’re prepping for a special occasion or want to elevate your everyday look, this guide shows you exactly how to curl hair with rollers and a hair dryer using pro techniques, the right products, and smart timing.
Forget stiff, outdated curls. With the right method, starting with 80–90% dry hair, using heat protectant, strategic sectioning, and proper drying, you’ll get soft, defined waves with maximum volume at the roots and a lived-in finish. This isn’t just about wrapping hair around a roller; it’s about mastering airflow, tension, and cooling to lock in long-lasting shape.
Prep Damp Hair for Heat Styling
Getting salon-quality curls starts before you even touch a roller. Proper preparation protects your hair and ensures the style actually holds.
Dry Hair to 80–90% First
Start with towel-dried hair that’s damp but not dripping. Ideally, your hair should be 80–90% dry before applying rollers. This moisture level allows heat to set the curl effectively while minimizing drying time and frizz. If your hair is soaking wet, it takes longer to dry, increases heat exposure, and raises the risk of damage.
Fine hair can handle slightly more moisture, around 85% dry. Thick or coarse hair should be closer to 90% dry for even heat penetration. Blow-dry your roots upside down for maximum lift before rolling. Skipping this step leads to flatness at the crown, no matter how well you roll.
Apply Heat Protectant
Heat styling always starts with heat protectant. Apply a mist or cream from mid-lengths to ends to shield against breakage, dryness, and split ends. Don’t skip this step, even low heat can cause cumulative damage over time.
Top picks include Hot Totty Protectant Mist from Dry Bar, L’Oréal Professionnel Tecni.Art Pli, and Osa Upload Bodifying Cream, which protects up to 150°C.
Add Volume with Mousse and Cream
Layer in volumizing mousse, about four pumps, from roots to ends. It may feel tacky, but it builds body and hold. For extra lift and texture, follow with a bodifying cream like Osa Upload, which adds lightweight support without stiffness.
Finish with these enhancements:
- Texturizing powder like KEVIN.MURPHY Powder Puff at roots for grip and volume
- Lightweight serum or oil on ends only to tame flyaways
- Light-hold hairspray like Color Wow Firm + Flexible to set the base
Use a wide-tooth comb to distribute products evenly and detangle before sectioning.
Section Hair for Even Curling
Proper sectioning ensures every strand dries evenly and holds its curl. Take time to divide your hair correctly before rolling.
Divide into Manageable Sections
Use a rat-tail comb for clean, straight partings. The four-section method works well:
- Mohawk section: 4–6 inch vertical strip from forehead to crown
- Front side sections: One strip along each eyebrow
- Ear-level sections: Two strips just above the ears
Alternatively, clip hair above the ears and work bottom to top for layered volume.
Match Section Size to Roller
Larger sections create soft waves with large rollers. Smaller sections with smaller rollers produce tighter curls. Keep sections separate and taut to prevent overlapping, uneven drying, or breakage. Overloading a roller weakens the curl and slows drying significantly.
Choose the Right Roller Type
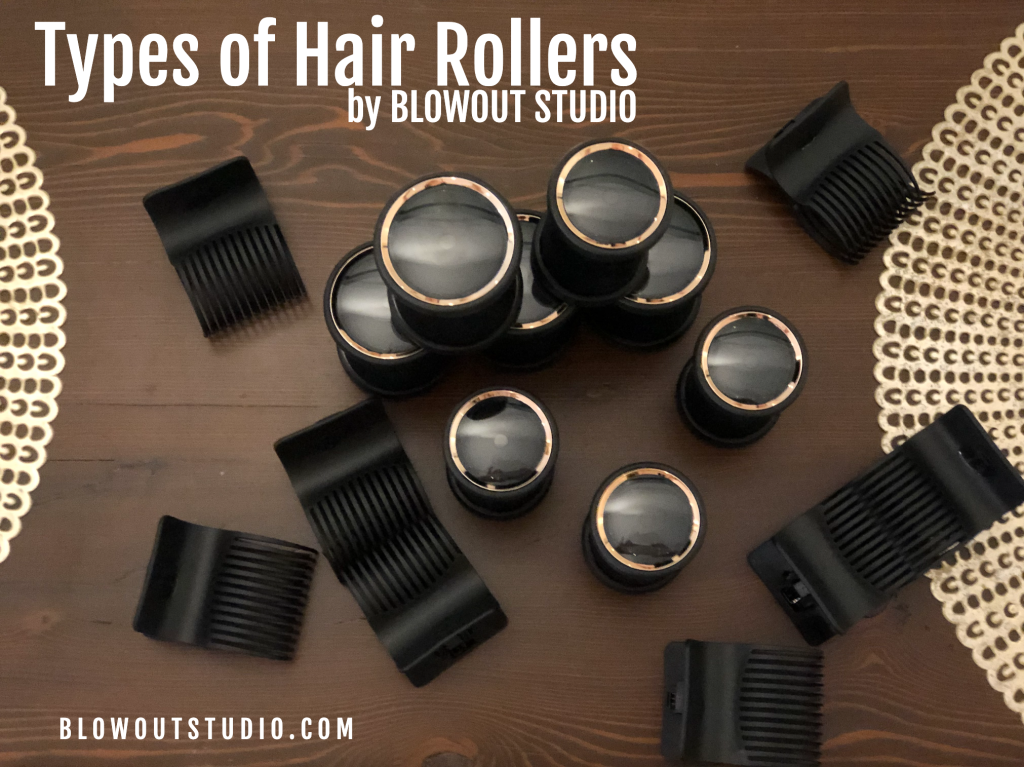
Not all rollers are created equal. Your choice affects drying time, curl definition, and the final look.
Velcro Rollers for Volume
Velcro rollers grip on their own and offer excellent airflow. They create loose waves and big volume, especially at the crown. Use with a hair dryer for 10–15 minutes. Best for fine to medium hair, quick sets, root lift, and vintage styles.
Heated Rollers for Long-Lasting Curls
Heated rollers like BaByliss Pro and Sam McKnight The Big Set offer built-in heat. These are the gold standard for salon-quality, long-lasting curls. Preheat, roll, and dry for 10–15 minutes. Boost with a hair dryer for extra hold. Best for all hair types and special occasions.
Magnetic and Clip-In Rollers
Magnetic rollers provide strong hold and work well with traditional wet sets. Clip-ins are easy to use solo and stay secure during drying. Both work well with a hair dryer for 20–30 minutes. Best for thick hair and strong curl retention.
Foam Rods and Flexi-Rods
Foam rods and flexi-rods are great for spiral curls and overnight styling. Use with a diffuser on low heat. The solid core means slower drying, expect 30–45 minutes. Best for defined curls and curly or coily hair.
Tension Rollers
Tension rollers hold hair through natural tension with no clips needed. They’re ideal for natural or curly hair and low-heat styling. Dry for 20–35 minutes on medium heat. Best for enhancing curl definition and reducing shrinkage.
Dry and Roll Section by Section
Now comes the actual technique. Work methodically through each section for consistent results.
Start with the Crown
The crown section is key for volume. Dry it front to back, flipping the hair over your fingers like turning pages in a book. Use low or warm heat and focus on lifting roots.
Roll diagonally backward to maximize lift. Use Velcro rollers in a center Mohawk pattern. Clip rollers between the roller and scalp, not on the roller itself. Split into three sub-sections if needed for precision. Avoid high heat, it’s uncomfortable and increases frizz.
Style Middle and Side Sections
Repeat the same drying and rolling process for each section. Dry each section completely before rolling. Use tension to smooth strands, similar to using a round brush. Roll from ends to roots, tucking ends under to avoid fish hook tips. Move the dryer slowly, rushing causes frizz.
Curl Bangs and Front Pieces
Front sections define your look. Dry thoroughly, front, back, and side-to-side, to prevent a middle split.
For curtain bangs, lightly rewet if needed, then curl inward. For long face-framing pieces, curl in opposite directions for natural fall. Rolling direction should be inward toward the face center for polished curls. Never clip in front, it causes creasing. Use the smallest roller for bangs to get a tight, defined curl.
Finish Back and Layered Sections
Work from root to tip, matching section size to roller. Use medium rollers for the back and small rollers for face-framing pieces. Layers add bounce and movement. One-length hair may look flatter, even with perfect technique.
Maximize Volume and Curl Definition
The difference between good curls and great curls lies in these volume techniques.
Lift Roots During Rolling
The higher you lift hair when wrapping, the more volume you create. Direct strands upward as you roll. For crown volume, roll diagonally or backward.
Use Tension to Smooth Strands
Just like with a round brush, place your hand or tool under the section. Pull down slightly to create tension. Roll upward, hold briefly, then release gently while warm. Rotate ends inward as hair cools. This prevents frizz and enhances smoothness.
Follow Rolling Direction Rules
Crown rolls backward for volume and a smooth curve. Sides and face-framing areas roll inward for defined curls. Bangs roll inward for a polished finish.
Apply Heat with Proper Technique

Heat application matters as much as the rolling technique itself.
Set Dryer to Medium Heat
Use medium heat and medium speed to avoid damage. Hold the dryer 6–8 inches from rollers.
Velcro, heated, and magnetic rollers need 10–30 minutes on medium heat. Flexi-rods and foam rods need 30–45 minutes on low-medium with a diffuser. Tension rollers need 20–35 minutes on medium. Never use high heat, it’s too intense and risky.
Use the Right Attachment
Use a diffuser for flexi-rods, foam rods, and curly hair for indirect heat. Use a concentrator nozzle for roots and precise drying.
Finish with Cool Shot
After heating, blast each roller with cool air for 10–15 seconds. This locks in the curl pattern by sealing the hair cuticle. Always finish with cool air, it’s the secret to long-lasting, frizz-free curls.
Let Curls Cool Before Removing
Patience is the final step to perfect curls.
Wait 20–45 Minutes
Leave rollers in for 20–45 minutes after heat application. This cooling phase lets hydrogen bonds in hair reform in the curled shape, which is critical for long-lasting results.
Shorter time around 20 minutes gives softer, looser waves. Longer time of 30–45 minutes creates firmer, bouncier curls. Use this time to do your makeup or skincare. Never remove rollers while hair is warm, curls will fall flat.
Remove Rollers the Right Way
How you remove rollers affects the final curl quality.
Twist and Pull Gently
Start from the back of the head and move forward. Remove clips first if used. Twist the roller gently as you pull it out. For Velcro rollers, unroll bottom to top to avoid disturbing nearby curls. Roll slightly downward following curl direction to soften the shape.
If you aren’t twisting your roller before you take them out, you’re doing it wrong.
Finish with Modern, Wearable Style
The final touches transform good curls into a polished, modern look.
Shake Out Curls
Use your fingers to gently separate curls. Avoid brushing right away, it can deflate volume. For a looser, lived-in look, lightly brush with a wide-tooth comb or paddle brush.
Add Texture and Hold
Layer in final products for the perfect finish. Osa Texture Craft Spray at roots adds texture. Osa Dr elastic-fiber gum controls flyaways and reduces shine. Osa Elastic Light Hold Hairspray is layerable, brushable, and non-sticky. Finish with Paul Mitchell Flexible Style Super Clean Hairspray for flexible hold.
Boost Volume with Powder
Sprinkle Osa Dusted Powder at roots for an extra wow effect and guaranteed lift.
Make Final Adjustments
Redirect ends if curls aren’t falling naturally. Brush gently until you achieve your desired shape. Let the style set fully before restyling.
Avoid Common Curling Mistakes
Learn from others’ errors to get it right the first time.
Common Mistakes and Solutions
Skipping heat protectant leads to damage, dryness, and breakage. Always apply first. Not tucking ends causes fish hook ends, so roll ends in first. Using one roller size only creates a flat, uniform look, so mix sizes. Removing warm causes curls to fall flat, so wait 20–45 minutes. Overlapping sections leads to uneven drying and breakage, so keep sections separate and taut.
Customize for Your Hair Type
Everyone’s hair is different. Adjust your approach accordingly.
Fine Hair
Best rollers are Velcro or small magnetic. Place at roots for lift. Use texturizing spray or mousse for grip if hair feels slippery.
Short Hair
Hair must be long enough for one full rotation. Use small rollers for curls or volume. Focus on root lift and face-framing.
Thick or Coarse Hair
Best rollers are heated or magnetic. Use medium-high heat around 360–410°F. Use lightweight mousse and avoid heavy creams that weigh hair down.
Curly or Coily Hair
Best rollers are flexi-rods or tension. Use low-medium heat around 280–350°F. These can be worn overnight with low heat for enhanced curl definition.
Damaged or Color-Treated Hair
Keep max heat at 250–320°F. Use steam rollers or low-heat settings. High-quality heat protectant is mandatory. Avoid direct high heat.
Make Curls Last All Day
Get the most mileage from your styled curls.
Cool Fully Before Removing
Longer cooling equals firmer, longer-lasting curls. Wait the full 20–45 minutes.
Use the Brick-Laying Pattern
Alternate roller placement to avoid hard lines and create natural movement.
Layer Products Strategically
Mousse plus light hairspray plus serum equals maximum hold and shine control.
Sleep in Rollers Safely
Only use flexi-rods or soft foam rollers for overnight styling. Never sleep in hot rollers due to burn risk.
Stay Safe and Protect Hair Health
Protect yourself and your hair during the styling process.
Avoid Heat Damage
Never exceed 410°F, it can cause bubble hair where air pockets form inside the shaft. Don’t concentrate heat on one spot. Start low and increase only if needed.
Prevent Burns
Don’t touch hot rollers with bare hands. Use clips or tools. Keep the dryer 6–8 inches from the scalp.
Electrical Safety
Keep the dryer away from water. Never use with wet hands. Unplug after use.
Hair Health Rules
Never sleep in hot rollers. Avoid overlapping sections. Don’t use on soaking wet hair.
Key Takeaways for Perfect Roller Curls
Mastering how to curl hair with rollers and a hair dryer delivers salon-quality results at home. The key is in the details: start with 80–90% dry hair, always apply heat protectant, section properly, and wait for full cooling time before removing rollers.
Choose the right roller type for your hair texture and desired outcome. Velcro rollers add volume, heated rollers create long-lasting curls, and flexi-rods are perfect for spiral definition. Mix roller sizes for natural-looking dimension.
Finish with modern products like texturizing powder and lightweight hairspray for a polished, wearable look that lasts all day. With practice, you’ll achieve bouncy, beautiful curls without the salon price tag.
Frequently Asked Questions About Curling Hair with Rollers
How long should I leave rollers in my hair?
Leave rollers in for 20–45 minutes after heat application. The cooling phase allows hydrogen bonds to reform in the curled shape. Shorter time gives softer waves, longer time creates firmer, bouncier curls.
Can I use rollers on fine hair?
Yes, Velcro rollers work exceptionally well for fine hair. They add volume and lift that fine hair often lacks. Use texturizing spray or mousse for grip if needed.
Do I need to use heat protectant every time?
Yes, heat protectant is mandatory before any heat styling. It prevents damage, dryness, and breakage. Apply from mid-lengths to ends before drying or rolling.
Can I sleep in hair rollers?
Only with flexi-rods or soft foam rollers. Never sleep in hot rollers due to burn risk. These low-heat options are designed for overnight use.
Why do my curls fall flat?
Curls fall flat when you remove rollers too early, don’t use heat protectant, or skip the cool shot. Always wait for full cooling and finish with cool air to lock in the curl pattern.



